Edraw Support Center
Get quick answers and step-by-step instructions in our support center.
Change Shape Layout
Rearrange Overlapping Shapes
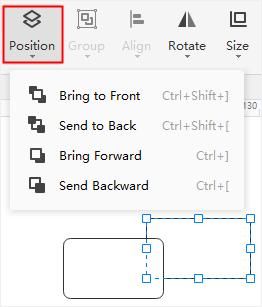
To bring the selected shape forward one level, you can
- Go to Home > Position and click Bring Forward
- Press Ctrl + ] (right bracket)
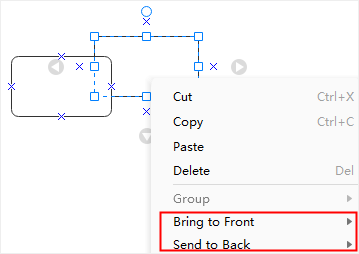
- Click Bring to Front > Bring Forward on the right-click context menu
To send the selected shape back one level, you can
- Go to Home > Position and click Send Backward
- Press Ctrl + [ (left bracket)
- Click Send to Back > Send Backward on the right-click context menu
To bring the selected shape in front of all other shapes, you can
- Go to Home > Position and click Bring to Front
- Press Ctrl + Shift+ ] (right bracket)
- Click Bring to Front > Bring to Front on the right-click context menu
To send the select shape behind all other shapes, you can
- Go to Home > Position and click Send to Back
- Press Ctrl + Shift + [ (left bracket)
- Click Send to Back > Send to Back on the right-click context menu
Align Shapes
To align two or more shapes, you can
- Select the first shape which you want other shapes aligned with, then press Ctrl and click to choose other shapes
- The primary shape has a thick magenta outline and you can press Tab to switch the outline into other shapes
- Go to Home > Align and pick up the desired option of alignment
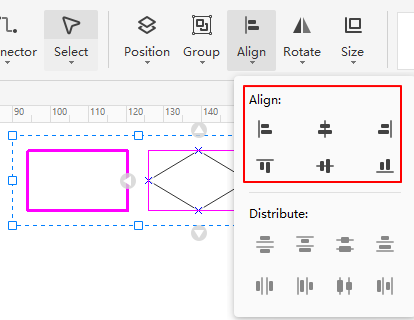
Tip: The Align command may be ineffective for connectors.
Distribute Shapes
To distribute shapes (three or more), you need to
- Select three or more shapes
- Go to Home > Align and choose a distribution option
- For Vertical distribution, the boundaries are defined by the top and bottom shapes in the selection
- For Horizontal distribution, the boundaries are defined by the leftmost and rightmost shapes in the selection
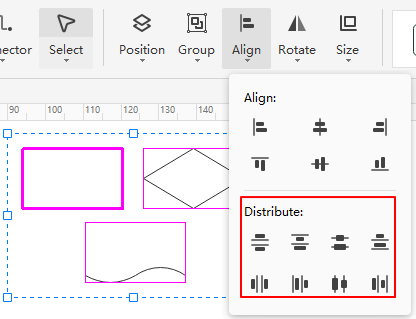
Tip: The Distribute command may be ineffective for connectors.
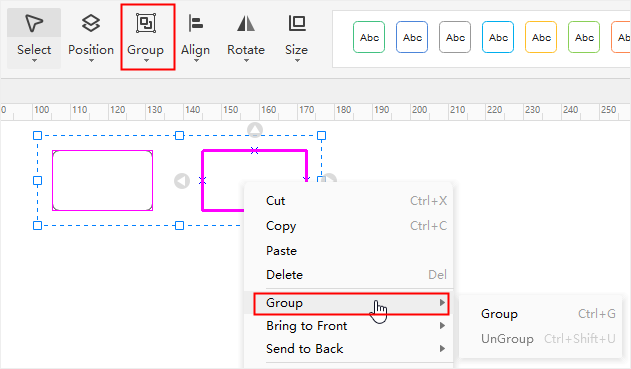
Group and Ungroup Shapes
To group shapes, select the shapes (two or more) you want to group, go to Home > Group and then click Group (or press Ctrl + G). Besides, right-click on the shapes and hit Group on the context menu.
To ungroup shapes, select the group, navigate to Home > Group > Ungroup, press Ctrl +Shift +U, or choose UnGroup on the right-click context menu.
Match Shape Size
To make shapes keep in the same width, height, size or angle, you can
- Select the shapes (two or more)
- Navigate to Home > Size, and you will see the Same Size tab; the reference shape has a thick magenta border
- Select the desired options
- Click Same Width
 to keep shapes in the same width with the reference shape
 - Click Same Height
 to keep shapes in the same height with the reference shape
 - Click Same Angle
 to keep shapes in the same angle with the reference shape
 - Click Same Size
 to keep shapes in the same size with the reference shape
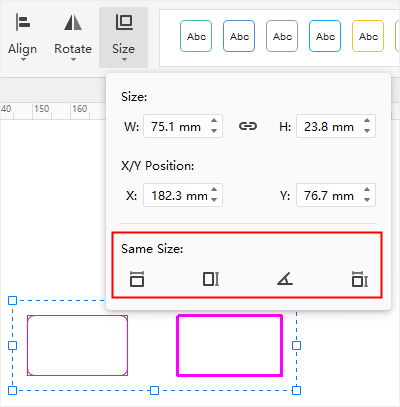
Note: The Same Size command will not affect connectors.
Center Shapes
To center a shape or shapes on the canvas, you can
- Unselect the shape(s);
- Right-click on the shape, choose Center on the context menu;
- If there is only one shape, then the shape will be moved to the center of the page
- If there are several shapes, these shapes will act as a group and the center point of the group will move to the center of the page
Watch this video to learn more. If the video doesn't play, please visit it at YouTube.
Timestamps
00:15 Select one shape, select mutiple shapes
01:00 Lasso select tool
01:17 Shape data and manage data
02:00 Move a shape
02:49 Resize a shape
03:24 Rotate a shape
04:02 Replace a shape
04:27 Protect shape
05:52 Rearrange overlapping shapes
06:42 Group and ungrap shapes
07:08 Align shapes
07:43 Distribute shapes
08:10 Match shape size
08:37 Center shape