Edraw Support Center
Get quick answers and step-by-step instructions in our support center.
Pen Tool
(Ctrl + E)
Draw Straight Lines with Pen Tool
It’s easy to draw straight lines with Pen Tool.
- Select Pen tool on Symbols tab.
- Put the cursor on where you want the straight segment to begin, and click to create the first anchor point (do not drag).
- Choose another position and click again, you will create a straight line.
- Continue clicking to set anchor points for additional straight segments.
- The last anchor point you add always looks like a solid square, indicating that it is selected. Previously added anchor points become hollow and deselected when you add more anchor points.
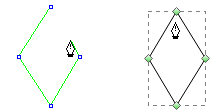
- Complete the path via 2 ways (applicable to other situations with pen tool):
- To close the path, position the Pen tool over the first (hollow) anchor point and click to close the path.
- To leave the path open, you can double-click in anywhere except the first anchor point.
Note: The first segment you draw will not be visible until you click a second anchor point.
Draw Curves with Pen Tool
You create a curve by adding an anchor point where a curve changes its direction, and dragging the direction lines that shape the curve. The length and slope of the direction lines determine the shape of the curve.
Curves are easier to be edited, displayed and printed if you draw them by using as few anchor points as possible. Too many points can also introduce unwanted bumps in a curve. Instead, it's a good way to draw widely-spaced anchor points, and practice shaping curves by adjusting the length and angles of the direction lines.
- Select Pen tool on Symbols tab.
- Position the cursor where you want the curve to begin, hold down the mouse and drag it. The first anchor point and the direction line appears.
- Drag to set the slope of the curve segment, and then release the mouse.
- Position the Pen tool where you want the curve segment to end:
- Continue dragging the Pen tool from different locations to create a series of smooth curves. Note that you need to place anchor points at the beginning and end of each curve, not at the tip of the curve.
- Complete the path through these ways:
- To close the path, position the Pen tool over the first (hollow) anchor point and click to close the path.
- To leave the path open, right-click in anywhere except the lines.
- To leave the path open, double-click in anywhere except the first anchor point.
Tips: In general, you can extend the direction line to one-third of the distance to the next anchor point you plan to draw. (You can adjust one or both sides of the direction line later.)
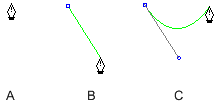
A. Position pen tool
B. Drag the direction line
C. Release the mouse and move to the next point position
To create a C-shaped curve, drag in the direction opposite to the previous direction line. Then release the mouse.
To create an S shaped curve, drag in the same direction with the previous direction line. Then release the mouse.
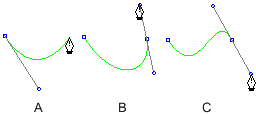
A. Create the second point
B. Drag away from the previous direction line to create a C curve
C. Drag in the same direction with the previous direction line to create an S curve
Draw Curves Followed by Straight Lines
- Select Pen tool.
- Use Pen tool to drag and create the first smooth point of the curved segment, and release the mouse button.
- Move to the position where you want the straight segment to end.
A. Create the second point
B. Drag away from the previous direction line to create a C curve
C. Drag in the same direction with the previous direction line to create an S curve
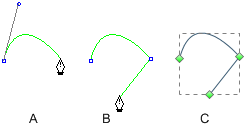
Draw Curves Followed by Straight Lines
- Select Pen tool.
- Use Pen tool and make anchor points in two locations to create a straight segment.
- Drag the first direction line to set the slope of the curved segment and move to the end point.