Edraw Support Center
Get quick answers and step-by-step instructions in our support center.
Fill Shape
Users can change the fill of a shape through these ways in Edraw Max.
- On Home tab, click Fill button and choose a fill option that you want.
- On the right sidebar, click Fill icon
 to open Fill panel. (The Fill panel can be opened via Fill button on Home tab.)
 - Right-click the shape and click Shape Format option and then choose a fill format that you want.
No Fill
To make a shape transparent or colorless, or to remove the fill from a shape, click this option.
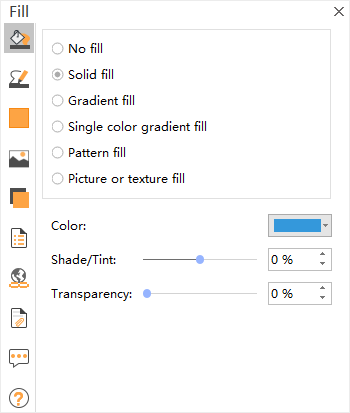
Solid Fill
To add colors and transparency to a shape, click this option.
Color: To choose a color for the shape, click Color, and then click the color that you want. To change to a color that is not in the theme colors (theme colors: A set of colors that is used in a file), click More Colors, and then either click the color that you want on Standard tab, or mix your own color on Custom tab. Custom colors and colors on the Standard tab are not updated if you later change the document theme (theme: A combination of theme colors, theme fonts, and theme effects. A theme may be applied to a file as a single selection).
Transparency: To specify the extent that you can see a shape, move the Transparency slider, or enter a number in the box next to the slider. You can vary the percentage of transparency from 0 (fully opaque, the default setting) to 100% (fully transparent).
Gradient Fill
To add a gradient (gradient: A gradual progression of colors and shades, usually from one color to another color, or from one shade to another shade of the same color) fill to a shape, click this option.
Preset colors: To choose a built-in gradient fill, click Colors, and then click the option that you want.
Type: To specify the direction to use when drawing the gradient fill, select an option from the list. The Type that you select determines the available Direction.
Direction: To choose a different progression of color and shades, click Direction, and then click the option that you want. The available directions depend on the gradient Type that you choose.
Angle: To specify the angle that the gradient fill is rotated within the shape, enter the degree value that you want. This option is available only when you select Linear Type.
Gradient Stops
Gradient stops consist of the stop position, colors, and transparency value. The transparency value applies to the gradient stop, not to the overall fill. Gradient stops are used to create non-linear gradients.
For example, if you want to create a gradient that goes from red to green and to blue at last, you need to add three gradient stops — one for each color. Or, if you want to create a gradient that shows up only in the corner of a shape, you need to use gradient stops to make the gradient non-linear.
Stop list: The gradient fill is made up of several gradient stops, but you can change only one gradient stop at a time. When you click the gradient stop that you want to edit in the list, the position, color, and transparency options reflect the current settings for that gradient stop.
Add: Click the black Add icon to add one stop.
Remove: Click the red Cross icon to delete a stop.
Stop position: To set the location for the color and transparency change in the gradient fill, move the Stop position slider or enter a number in the box below the slider.

Pattern Fill
To fill the shape with special pattern, click this option. You can select the pattern in Hatch option, and then choose the Foreground color and the Background color in the corresponding option boxes to make a special pattern.
Picture or Texture Fill
To use a picture as the fill for a shape or to add texture to a shape, click this option.