Light Switch Wiring Diagram: A Complete Tutorial
Know it All about Light Switch Wiring Diagram
EdrawMax Wiring Diagram Software create professional wiring diagram for free with easy-to-edit templates and symbols. Give it a try!
In this article, we provide some helpful light switch wiring templates for free use, as well as introduce typical wiring symbols in light wiring for further use. If you don't know much about a light switch diagram, we offer basic information about light switches for a quick view. Read it now!
Following are some practical illustrations of the light switch wiring to make our minds and concepts more precise. You can use the free templates and edit them by yourself.
This is the wiring of the single pole switch, in this case, the power source is with the switch, plus two wires are coming from the switch to the light. We can see the two brass terminals both the black hot wires are connected with the two terminals of the switch. The neutral white that is the white wire is coming from the source and is connected with the white wire and is going to the light. In the light, both white and black wires are connected with the terminal.
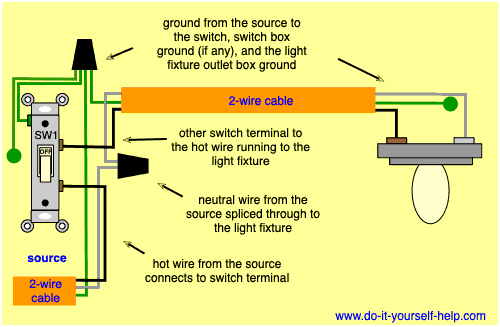
Source: www.do-it-yourself-help.com
You must understand how to wire a single light switch wiring diagram when wiring light switch. Single light switches connected in series. This means that when one light switch in the circuit is on, every light switch will be turned on too. But when one light switch is turned off, every light switch in the circuit will be turned off too. So if you have four light switches in a circuit, each one will control four light switches.

Click here to see the HD version of the template.
1. Download Single Light Switch Wiring Diagram template by clicking here for free.
2. Use EdrawMax Wiring Diagram Software to open and use this template. Download from the button below.


You don’t have to understand this figure much as the elaboration is mentioned above. Here the two switches are in the same box. Two wires coming from each switch are connecting to the light. The white wire is connected with the one terminal of the bulb, and the black wire is connected with the second terminal.
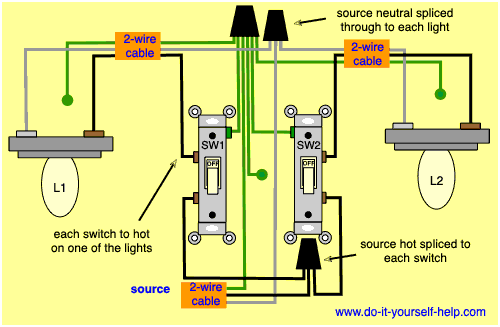
Source: www.do-it-yourself-help.com
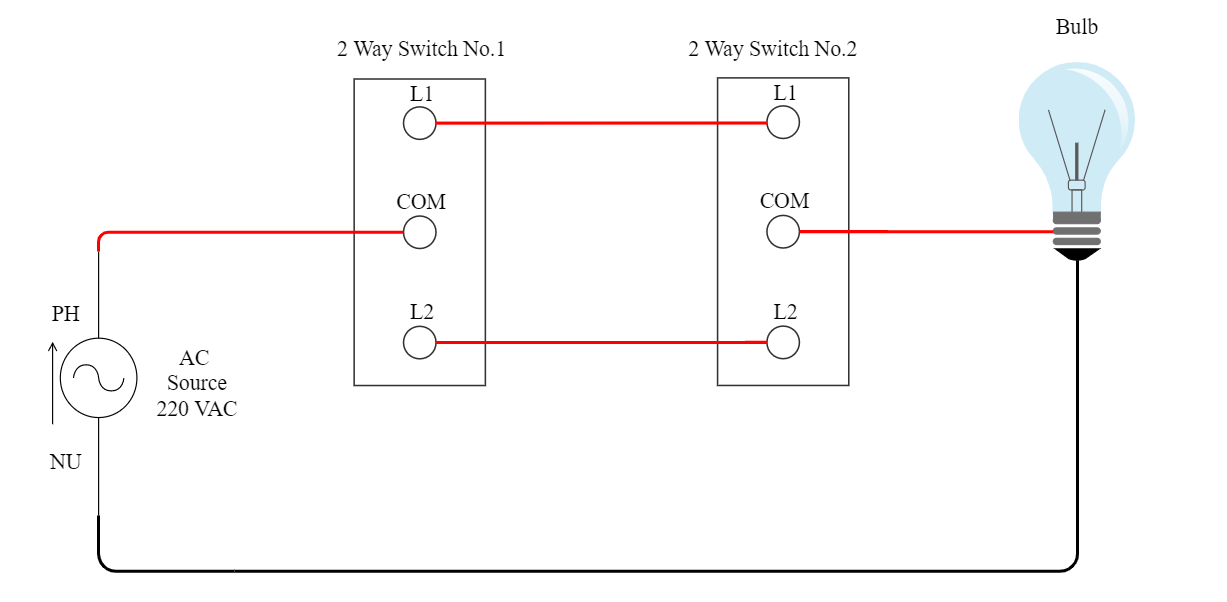
A 2-Way Switch wiring diagram depicts the wiring that allows incoming and outgoing circuits to be connected in a way that can be turned on and off from either end. Two-way switching is usually between a two-way radio and a transmitter/receiver. This circuit is a quick way to show you how a two-way switch works.
1. Download 2-Way Switching Wiring Diagram template by clicking here for free.
2. Use EdrawMax Wiring Diagram Software to open and use this template. Download from the button below.
Here in this illustration, the case is unique as we are wiring multiple lights with the same switch. Two wires are flowing from the switch’s terminal, and these are hot, white, and the neutral wire passes to each light terminal. This type of wiring makes multiple lights glow at the same time. more precise
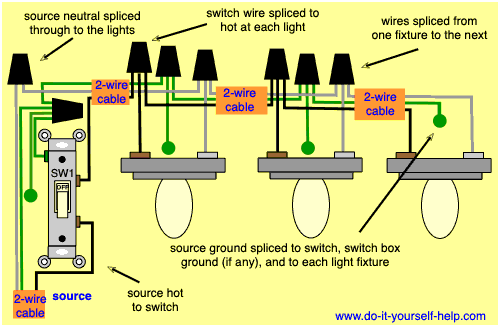
Source: www.do-it-yourself-help.com
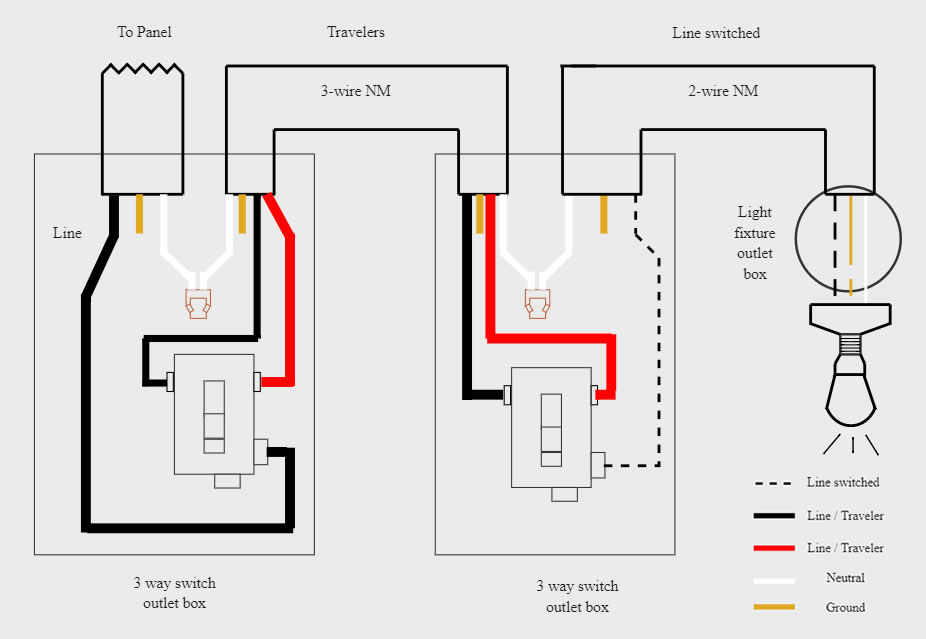
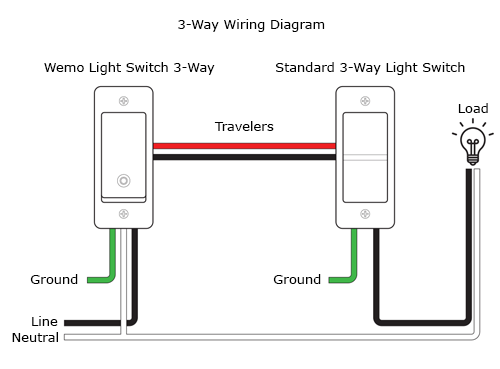
A 3-way switch wiring diagram is an electrical diagram of a three-way switch or three-way circuit breaker. 3-way switches control lights such as wall lights, ceiling fans, and room lighting. It can switch electrical appliances such as coffee makers or heaters. These switches work with a three-pronged plug and may have a keyhole. They usually consist of two rocker switches and a center button. Some switches have a single position instead of two rocker switches.
Click here to see the HD version of the template.
1. Download 3-Way Switching Wiring Diagram template by clicking here for free.
2. Use EdrawMax Wiring Diagram Software to open and use this template. Download from the button below.
Many wiring diagram symbols can be chosen to use when creating light switch wiring diagrams. And wiring diagram always has its own strict symbols' rules for all these. So, it's important to learn their meanings and usages before using them, and you can click and learn wiring diagram symbols here.

It is essential to wire a light switch correctly. Wiring it incorrectly often leads to a fire in the switchboard that causes significant accidents. It may also give the electric shock. So, it is best always to consult the electrician to wire your light and switch.
The people who are the developers of the light and switches need to make their product efficient and without defects. So, it is good to design their wiring diagrams from the software available on the internet. And here is the one!
Learn how to draw a light switch wiring diagram with ease! Try EdrawMax Wiring Diagram Software to use pre-made templates and edit by yourself!
EdrawMax Wiring Diagram Software is the best easy-to-use software that is used for diagram making. EdrawMax is for everyone, either you are an electrical engineer or a person with no technical background. You can easily design your diagram because the software provides you all the features that will suffice you in your diagram making. EdrawMax is free for primary designing of the diagram, but if you want to groom your diagram more, it is better to select the pricing option of the software.
Watch this video to learn how to draw a light switch wiring diagram with ease!
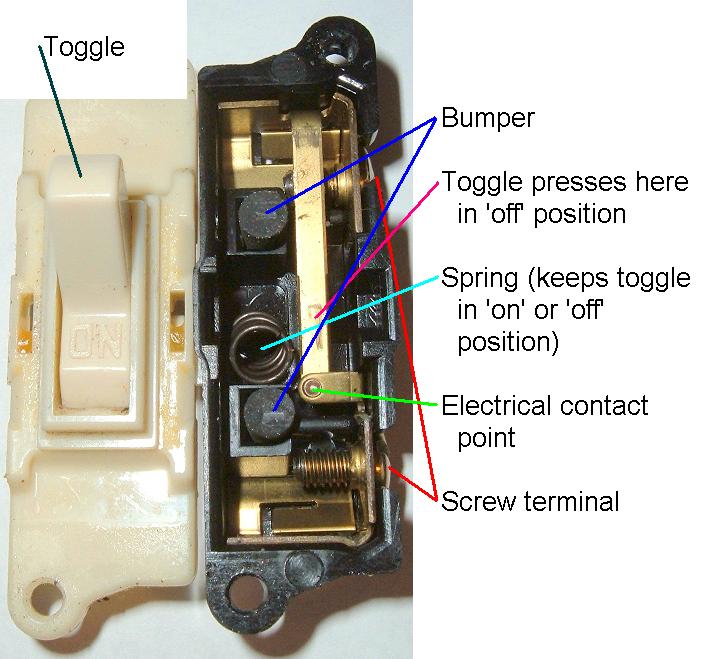
The light switch is an electrical component used to control and operate the lights, bulbs, the equipment connected with it, and any electrical outlet connected with it. Switches are of different types and are used for different purposes. Usually, the switches only do ON or OFF the device that is connected with it. But as time flows, more advanced features have come with the switch like the dimmer switches that dim the light and ON/OFF it too, a time-dependent switch that works at a specified time, remotely controlled switch that you can control from a remote place.
You may see light switches in many devices like vehicles, home appliances, machines, etc. But the light switch was invented for home lights to turn then ON or OFF and they are wall-mounted switches.
The switch’s outside is usually made up of plastic. Inside a light switch, there is a spring that makes the button move up and down. The switch contains two brass terminals screws. One is on the position where the black aka hot wire connects the circuit, and the other is on the side where the power source black wire connects it.
Source: wikipedia.org
The light switch has three wires.
Source: www.belkin.com
If want to use an efficient tool for wiring diagram creation, try this out!

・ Simple alternative to Visio
・ 26k+ symbols
・ 10K+ free templates
・ 10+ AI diagram generators
When the current is passed through the switch to the load, that is, bulbs, ceiling lights, etc. It makes the light turn ON. But when you push the button to OFF the light, it entirely breaks the circuit, and the passing of electricity is interrupted. What happens is there is always a space between the hot wire and the switch. When we make the switch close, it’s then contacted with the hot wire delivering the power to the load and then from the standard wire to the power source.
In this section, we will talk about how to wire a light switch. Typically, we purchase a switch from the market but for some unique situations, when you have to make it by your hand, then follow these steps.
For wiring a switch, you must have these tools and equipment.
We will go through the two primary configurations for wiring a light switch.
In the first step, the power comes to the switch and then travels to the light. For this configuration, you will have to work with the three wires mentioned above.
Now you have to configure the switch in such a way that power comes from the light. You have to work with the white, black, and one bare wire coming from the box you configured above.


