Elevation Plan Complete Guide
Edraw Content Team
Do You Want to Make Your Elevation Plan?
EdrawMax specializes in diagramming and visualizing. Learn from this elevation plan complete guide to know everything about elevation plan. Just try it free now!
An elevation plan provides us with an idea about what the finished building will look like. Just as a floor plan or a reflected ceiling plan illustrates how the building's floor or the ceiling will look after completion, the elevation plan shows the structural and architectural details of a building. In the architecture industry, the term 'elevation' refers to an orthographic representation of the exterior sides of any building. In some cases, we use elevation plans to illustrate the interior. As Francis D.K said,
"An elevation is an orthographic projection of an object or construction on a vertical picture plan parallel to one of its principal faces."
In this elaborated guide of understanding the elevation floor plans, we will help you understand why the Elevation is drawn from a vertical plane looking straight onto a building facade, what are some of the most basic types of elevation plans, some of the key examples of Elevation drawing to let you understand it on a deeper level. Lastly, we will teach you how to draw an elevation floor plan using the free templates and symbols provided by EdrawMax.
1. What is a Elevation Plan
An elevation plan or an elevation drawing is a 2D view of a building or a house seen from one side. In general, the elevation floor plan is a two-dimensional flat visual representation of one facade as it displays the height of key features of the development about a fixed point from the ground level.
In most cases, the architects and builders use elevation plan to illustrate a portion of the building to get their client's approval.
In general, the elevation floor plan is a two-dimensional flat visual representation of one facade as it displays the height of key features of the development about a fixed point from the ground level.
2. What is Included in an Elevation Plan
In most building design planning, we use rectangular shapes in the plan, making the elevation drawingthe first angle projection that illustrates all the major parts of the building in general as seen from one particular direction with the perspective flattened. It should be noted here that to create the elevation plan, the elevations are produced for four directional views: North, South, East, and West.
When you start making an elevation plan, you should first consider what you are looking for and what resources you currently have. As you must know, some of the elevation drawings will include:
- The basic outline of the building.
- The outlines for the main door, windows, and garage area (if any).
- The detailed dimension and shape of the required roof area.
- Some important projects like eves and pipes.
- Some of the most accessed elevation plans will include level datums, like the finished ground level and floor positions.
- Dimension of the entire building is noted on the sides.
- Legends, notes, and scale are mentioned at the bottom of the elevation floor plan.
- Any other portion of the building (like a chimney or water tank on the roof) may be visible from a certain projection angle.
- Balcony areas or the exterior walls that are already completed by the builder.
The basic outline of the building;
The detailed dimension and shape of the building;
Some important projects like eves and pipes;
Legends, notes, and scale are mentioned at the bottom of the elevation floor plan.
![]() You can design your elevation plan more simply and conveniently through EdrawMax. Learn more about it and try it free.
You can design your elevation plan more simply and conveniently through EdrawMax. Learn more about it and try it free.
3. The Purpose of Elevation Plans
The core purpose of creating an elevation plan is to illustrate what the exterior and interior of an actual building elevation would look like when seen from the front or a particular angle. In addition to this, the elevation plan or elevation drawing serves several other important purposes, like:
- Easy Construction: Once you have laid out everything in the elevation drawing, you now know how the entire building or the house will look from the front. It will give you an n-number of chances to make any changes that you deem fit with the right budget and resources.
- Easy Maintenance: If you have created an elevation plan while constructing your house, you will know everything that went into making the front of the building. If your house needs renovation or some maintenance work, you can share it with the builder, who will know the exact place they need to put down their efforts.
- Saves Resources: Another important benefit of creating an elevation floor plan is to save money and time. If you are not happy with the elevation drawing, you will surely not be happy with the final house design. So, instead of wasting your hard-earned money on the building, you can put all of your efforts into creating the right elevation floor plan. Once everyone involved in the project is completely satisfied, you can only begin the construction work.
- Easy Modifications: Changing or modifying the front of the house or any other important interior part is extremely easy with the elevation plan. For instance, with the help of an elevation drawing, you can change the position of windows, modify the height of the chimney, change the locations of the shelves or doors, or more!
- Easy Accessibility: Like any other architectural design, an elevation drawing informs the owner or the builder of any unexpected problem they might face while building the house. For instance, the elevation plan includes the existing walls or trees that might interfere with an overhang.
The core purpose of creating an elevation plan is to illustrate what the exterior and interior of an actual building elevation would look like when seen from the front or a particular angle. Also, it has more purposes, such as easy construction, easy maintenance, saves resources, easy modifications, easy accessibility.
![]() You can design your elevation plan more simply and conveniently through EdrawMax. Learn more about it and try it free.
You can design your elevation plan more simply and conveniently through EdrawMax. Learn more about it and try it free.
4. Elevation Plan vs. Floor Plan
In most cases, the elevation plan and floor plan sound almost alike. However, there is a huge difference between the two. Before we evaluate the similarities and differences between an elevation drawing and a floor plan, let us first understand the meaning of these two drawings.
As we stated in this guide, an elevation plan is the visual representation of a building's front and will include details of the front doors, windows, chimneys, and the height of the entire house from the finished ground to the roofing area. At the same time, a floor plan is a two-dimensional illustration of rooms inside the house, showcasing the walls, windows, and other important furniture, like sofas, TV units, dining tables, and more. On the one hand, when an elevation plan only reveals the front of the house, a floor plan will go ahead and show you the entire house from the bird-view.
Similarities between elevation plan and floor plan:
-
Both show the pre-constructed layout of the building.
-
Both are required if you need to have better accessibility and maintenance in the future.
Difference between elevation plan and floor plan:
-
While a floor plan offers a general layout of the room design, the elevation drawing gets the viewer inside the room and can see a clearer picture.
-
The floor plan, in general, will include elements like doors, windows, sofas, and other furniture, as seen from the top. The elevation floor plan shows the front of the house, with the actual dimensions labeled next to them.
![]() You can design your elevation plan more simply and conveniently through EdrawMax. Learn more about it and try it free.
You can design your elevation plan more simply and conveniently through EdrawMax. Learn more about it and try it free.
5. Understand The Plan, Elevation, and Section
While working on the elevation plan or any other important building plan, you will come across terms, like 'The Plan,' 'Elevation,' and 'Section.' Most of the time, the interior designers get confused with the terminology. So, please take this guide as your reference to understand the meaning, similarities, and differences between the plan, Elevation, and section.
A plan is a visual representation on a horizontal plane that shows a view from above in the architecture world. On the other hand, an elevation is an illustration on a vertical plane that shows a vertical depiction of a building's exterior and interior. Lastly, a section drawing cuts through space to show what lies within it.
Let us help you understand the plan, Elevation, and section in much better ways:
- The Plan drawing is often used to depict the layout of a building, showing locations of rooms and windows, walls, doors, and stairs.
- An elevation plan is drawn from a vertical plane looking straight onto a building facade or interior surface.
- Section drawings are orthographic projections, meaning that they are not drawn in perspective, and there is no foreshortening.
![]() You can design your elevation plan more simply and conveniently through EdrawMax. Learn more about it and try it free.
You can design your elevation plan more simply and conveniently through EdrawMax. Learn more about it and try it free.
6. Classification of Elevation Plans
Like every other building plan, an elevation plan is also divided into multiple types based on their usage and types. Some of the highly used elevation plans are used here to give you a reference about different types and their classifications.
- Building Elevation
- Home Elevation
- Kitchen Elevation
- Bathroom Elevation
Meaning: Building Elevation means the view and illustration of any building from any 1 of 4 sides showing features such as construction materials, design, height, doors, dimensions, other architectural features, and the relationship of grade to floor level.
Types: In the architecture scenarios, there are different types of building elevations, like Front Elevation, Side Elevation, Rear Elevation, and Split Elevation.
Connector Line: Helps in connecting two different HVAC units.
Usages: The building elevations are drawn to help the architect understand the facing of any building. In most cases, the facing includes the direction of the sunlight and wind, the height of the building, along the doors and windows.
Definition: A home elevation is a face that has a direction perpendicular to the Front Elevation. In general, a home elevation is of a rectangular or square building showing two sides of elevations based on the length of the side elevation.
Types: Just like a building elevation, there are different home elevations, like Front Elevation, Side Elevation, Rear Elevation, and Split Elevation.
Usages: The Elevation of a home sets the first impression for your entire home and, to a certain extent, gives an insight into the taste of the occupants. At the very same time, the house elevations show the interior and exterior features of the house.
Definition : A kitchen elevation is a drawing of a kitchen from the front, rear, or side that indicates the structure of the entire kitchen in a more detailed way. In most cases, the kitchen elevation floor plan shows the kitchen gadgets and kitchen furniture layout.
Types : There are different kitchen layouts, like the one wall kitchen, galley kitchen, L-shaped kitchen, U-shaped kitchen, island kitchen, and peninsula kitchen. All these different layouts have their respective side elevation, front Elevation, rear Elevation, and split Elevation.
Usages : A kitchen elevation plan lets you see everything related to the kitchen from other viewpoints.
Definition: As the name suggests, a bathroom elevation visualizes the bathroom from the top, side, rear, and front side.
Types : There are different bathroom layouts, like the full bathroom, three-quarter bathroom, half-bathroom, quarter bathroom, primary bathroom, Split bathroom, corner shower bathroom, and more. All these different layouts have their respective side elevation, front Elevation, rear Elevation, and split Elevation.
Usages: The bathroom needs to be located in a private position in the floor plan within easy reach of the bedrooms. By creating the bathroom elevation plan, you can easily locate such spacing in your building.
- Building Elevation
- Home Elevation
- Kitchen Elevation
- Bathroom Elevation
![]() You can design your elevation plan more simply and conveniently through EdrawMax. Learn more about it and try it free.
You can design your elevation plan more simply and conveniently through EdrawMax. Learn more about it and try it free.
7. Symbols of an Elevation Plan
An elevation drawing is drawn on a vertical plane showing a vertical depiction. A section drawing is also a vertical depiction that cuts through space to show what lies within. EdrawMax includes many elevation plan symbols , including bathroom symbols, kitchen symbols, bedroom symbols, etc. In the EdrawMax library, you can easily use these elevation floor plan symbols to depict elevation shapes, frames, dividers, drawers, baskets, lattices, cabinet light, ceiling light, double-door, rear doorway, etc.
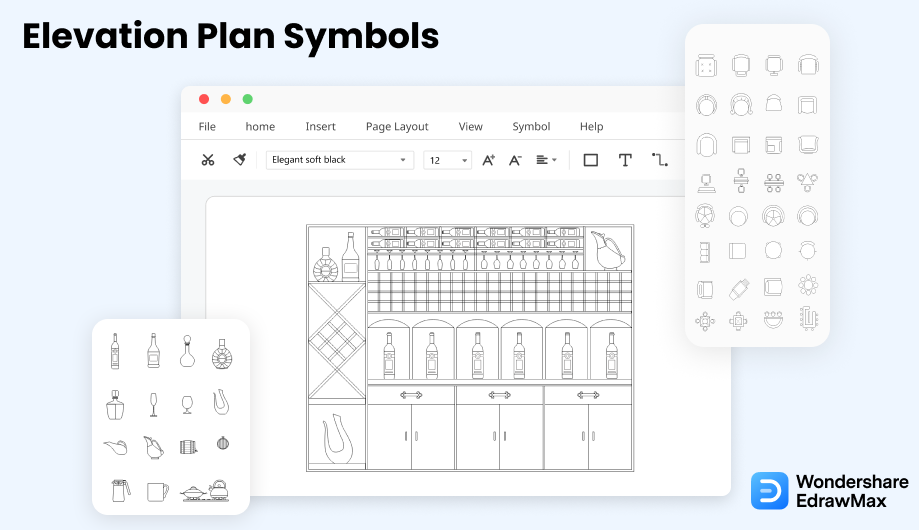
It should be noted here that there are hundreds of elevation plan symbols that you can use to create your elevation floor plan. Here we have laid out a couple of highly used elevation plans that will give you a basic understanding of the elevation plan symbols.
- Frame: A frame would be a rigid structure surrounding anything like a picture, door, or windowpane.
- Divider: A divider symbol is to show something that divides a whole into more than two parts.
- Drawer: A drawer symbol is a visual representation of a box-like storage compartment without a lid, made to slide horizontally in and out of a desk.
- Hooks: A hook symbol is the visual representation of pieces of metal or other hard materials curved or bent back at an angle.
- Desk Lamp: Desk Lamps are the symbols for the gadget that we put on the desk and can be helpful to work efficiently and comfortably.
- Drainage Pipe: Drainage Pipe is a visual representation of a pipe that removes water from a particular area in the kitchen or the bathroom.
- Gas Cooker: A gas cooker is a range with gas rings and an oven for cooking with gas.
![]() You can design your elevation plan more simply and conveniently through EdrawMax. Learn more about it and try it free.
You can design your elevation plan more simply and conveniently through EdrawMax. Learn more about it and try it free.
8. How to Read an Elevation Plan
You should have a proper understanding of reading an elevation plan like an HVAC floor planx or a building layout, which has a learning curve to read. In the architecture classes, most professors teach their students that when they start working on the building plans, they should first start by understanding the elevation plan in detail. Here we will help you understand how easy it is to read an elevation plan and what you have to do before you start creating an elevation floor plan for your building.
An elevation is a drawing that shows any particular side of a house. If the floor plans are like looking down at a house without a roof, the Elevation is like looking at it from the side. There are certain ways to read the elevation plan, which will include:
- Title & Scale: The title tells the builder which face of the house the drawing represents. Some architects and drafters use compass directions, specifically referring to the face of the home facing a particular direction on a site. Simultaneously, the scale tells us how the drawing on paper compares with the real thing built in the real world.
- Doors and Windows: An elevation floor plan draws openings on the elevations corresponding to window sizes. Based on the intended style of your home, your architect will show the openings with recommended trim, grills, and other window treatments.
- Roof Pitch: The roof pitch of a house tells the builder how steep the roof is. This symbol displays two numbers, a rise, and a run.
- Elevation markers: In elevation floor plan design, elevation markers are usually dashed lines that show where each level's floor and plate lines correspond to the Elevation.
- Ground Plane: In architecture and building scenarios, the ground plane illustrates the estimated location of the ground about the building.
- Title & Scale: The title tells the builder which face of the house the drawing represents;
- Doors and Windows: An elevation floor plan draws openings on the elevations corresponding to window sizes;
- Roof Pitch: The roof pitch of a house tells the builder how steep the roof is;
- Elevation markers: elevation markers are usually dashed lines that show where each level's floor and plate lines correspond to the Elevation;
- Ground Plane: the ground plane illustrates the estimated location of the ground about the building.
![]() You can design your elevation plan more simply and conveniently through EdrawMax. Learn more about it and try it free.
You can design your elevation plan more simply and conveniently through EdrawMax. Learn more about it and try it free.
9. Preparations Before Starting Elevation Plan
There are a lot of important activities that go into making an elevation plan. Even though you can modify the design using EdrawMax, it is always advised to properly understand your elevation floor plan ready in your mind before you set out and start drawing it.
Some of the key important factors that you must consider while creating an elevation plan includes:
- Dimension Assessment
- Assess the objects
- Understand other plans
Sit down with your architect or your client and take the measures of height, width, and length of the wall that you plan to draw the diagrams of the elevations.
Ensure that you have the right measurement of the objects you might require in the elevation plan drawing. Some of the most important objects are windows, doors, cabinets, etc.
Even before you start making an elevation plan, it is highly recommended to understand other important plans, like floor plan, reflected ceiling plan, and plumbing and electrical switches.
Only have a detailed preparation can people to have a good base of elevation plan. Once have prepared the elevation elements, you may move into next step.
- Consider the measures of height, width, and length of the wall;
- Consider that you have the right measurement of the objects you might require in the elevation plan drawing;
- Consider to understand other important plans, like floor plan, reflected ceiling plan, and plumbing and electrical switches.
![]() You can design your elevation plan more simply and conveniently through EdrawMax. Learn more about it and try it free.
You can design your elevation plan more simply and conveniently through EdrawMax. Learn more about it and try it free.
10. How to Design a Elevation Plan in General
There are two ways of creating an elevation plan -- one is an old-age traditional way where you sit down with pen and paper to jot down everything, and another is where you use a tool well equipped to create an elevation plan. Before we share the easy ways of creating the elevation plan, let us walk you through the traditional ways of creating the diagram with you.
Creating an elevation plan is a complex process if you do not access the symbols. So, even before you start visiting the site, you should finalize all the important symbols you might need while creating the elevation plan.
In order to draft your elevation plan, you will start with your floor plans for the main floor of the building or the commercial property. The easiest method is to draw the elevation floor plan to the same scales as your floor plan. At the same time, to make the entire process easier, you have to consider:
- Taping your main floor plan drawing to the surface of your work table with the front side of the building facing towards you.
- Taping the sheet of paper for your elevation drawing below or above the floor plan.
In order to create the elevation plan using traditional ways, you need to follow the following steps:
Step 1: Drawing main floor wall baseline
Take the reference of your floor plan drawings and measure the horizontal distance of any halls. Ensure that you are including the thickness of any siding material for the exterior sidewalls, as the starting side can be very thin in the case of parging or thick in the case of bricks.
Step 2: Determining the wall heights
After measuring the main floor wall, you will draw the vertical lines for the exterior wall. It would help if you always determined how high the wall would be above its unfinished floor height. To do this, you will need to consider the height of the ceiling of the rooms within this section of the building and add to that the height of any floor or ceiling joists above it.
Step 3: Draw windows and door outlines
To draw all the windows and doors, measure from the horizontal lines of your floors to position the exterior doors and windows. A separate window and door schedule will give the dimensions for all of your windows and doors.
Step 4: Drawing the roofs
There are multiple different types of rooflines, like gable, shed, hip, and gambrel, that you can use to create your roof. In order to draw the roof for each elevation view, you should first consider whether the roof will overhang and drop below the exterior wall on the elevation plan you are currently drafting.
Step 5: Adding decks and railings
Once the windows, doors, roof, and the basic elevation drawing are done, you can start drawing the decks or porches, railings, and stairway. After completing this, you can accurately measure what you plan to have as the difference of your main floor height to the final level of the landscaping around the house.
- Drawing main floor wall baseline;
- Determining the wall heights;
- Draw windows and door outlines;
- Drawing the roofs;
- Adding decks and railings.
![]() You can design your elevation plan more simply and conveniently through EdrawMax.
You can design your elevation plan more simply and conveniently through EdrawMax.
11. How to Design a Elevation Plan in EdrawMax
Now that you have understood the basic symbols and how tough it is to create an elevation using traditional methods, it is time to navigate you through the steps of creating your first elevation drawing using EdrawMax. Even if this is your first time accessing the tool, you will find it intuitive and user-friendly. If you have been designing the Elevation for ages, you will find all the important tools and symbols in the symbol library present in EdrawMax.
Instead of wasting time drawing a elevation plan on paper, you should look for a way to design a elevation plan easily. EdrawMax is well equipped to design a elevation plan. There are only a couple of steps that you need to follow in order to easily create it, like:
Step1 Open EdrawMax and Login
If you are using the offline version of EdrawMax, then open the tool in your system. If you wish to have remote collaboration, head to https://www.edrawmax.com/online/ and log in using your registered email address. If this is your first time using the tool, you can register yourself using your personal or professional email address.
Step2 Create Outlines
Elevation plan is all about understanding the right dimensions of the house or the building, including height and width. If you are planning the Elevation of the house's interior, like the kitchen or garage, then learn to create the outlines using the user-friendly dashboard. Remember that dimensions and symbols play an important role here. So you can easily adjust them or import them from the EdrawMax dashboard. At the same time, note the dimensions and the scales of the elevation plan that you will use to create the reflected ceiling plan.
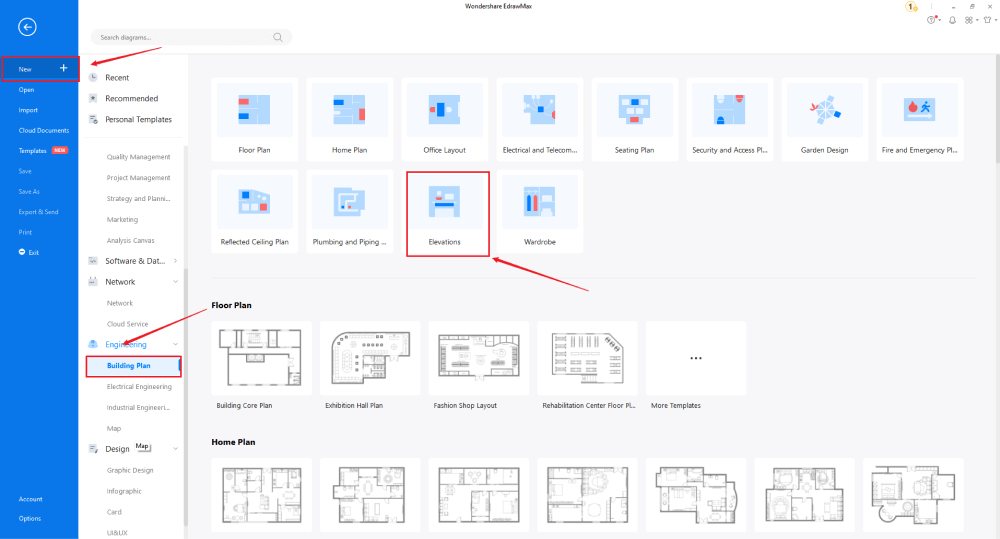
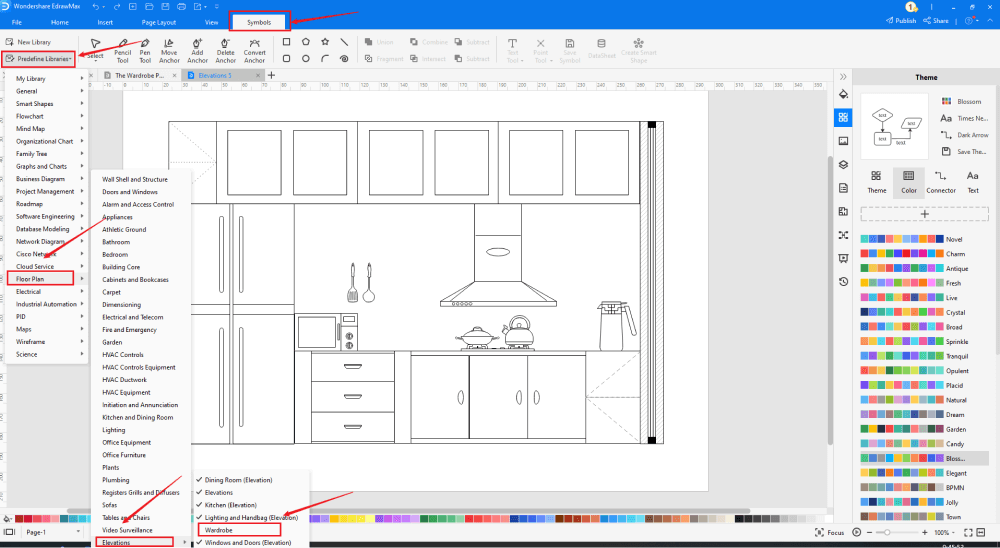
If you need to access the free reflected ceiling plan templates, click on the 'Templates' option from the left panel of the EdrawMax tool and type 'Elevation Plan' in the search bar. You will see hundreds of free reflected floor plan templates readily available at EdrawMax. Click on any of these templates and start customizing them as per your requirement. Alternatively, you can also click on 'Building Plan' on the left side of the diagram panel. It will open up different diagram types, like Floor Plan, Electrical and Telecom Plan, Seating Plan, etc. Click on 'Elevation'. It will open up several elevation plan templates.
Step3 Create from Scratch
In order to create the Elevation Plan from scratch, click on 'Building Plan,' which you can find on the left panel of the tool. Upon clicking, you will see a list of different 'Building Plans' that you can create with EdrawMax, like Floor Plan, Home Plan, Office Layout, etc. Click on 'Elevation Plan' and click on '+' to design the security and access floor plan from scratch.
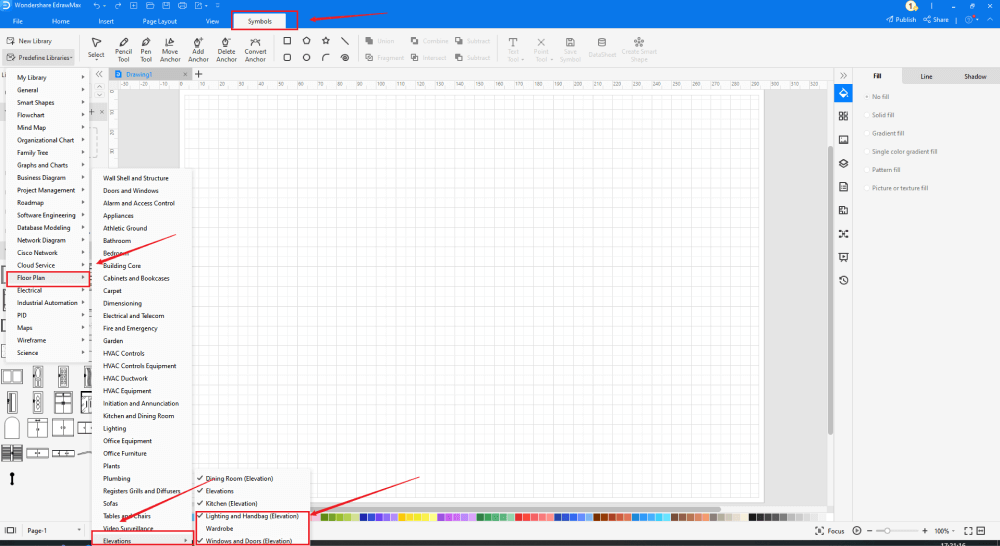
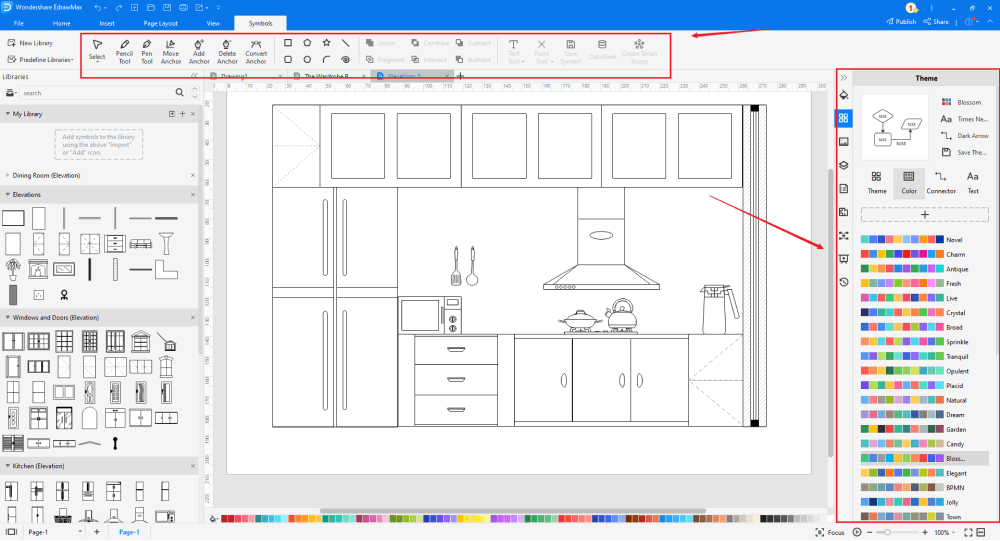
Step4 Select the Symbols
EdrawMax comes with over 50,000 vector-enabled symbols. You will find all the required symbols in the drawing canvas, like Lightings and Handbag (Elevation), Windows and Doors (Elevation), Elevations, and more. You can import them on the canvas and start customizing as required. If you do not find the right Elevation drawing symbol in the symbol library, you can create your symbol and save it in the library section for future usage.


Know more about elevation symbols, and try to drag and drop the symbols you want to customize your elevation plans.
Step5 Add Components
Now that you are on the drawing canvas, you can create the elevation plan. Remember to add additional electrical equipment you deem fit for the house. If you are building the interior, add the sofas or the equipment that will accompany the room design. If you are making the elevation plan for the outside of the building, then add components like a CCTV camera, front door, garage door, and such.
Step6 Change Dimension
You will find 'Dimensioning' in the Symbol section. Click on the one that you need. EdrawMax lets you change the dimension of them without losing the formatting. Click and hold them and increase or decrease their size as per your requirement.
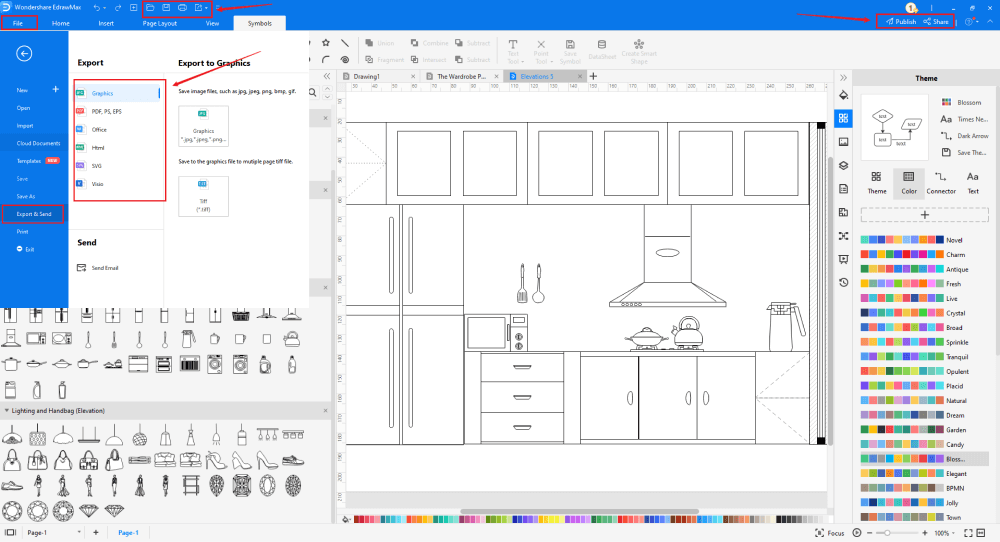
Step7 Export or Share
Once your elevation plan is ready, you can easily share it using EdrawMax's special sharing feature. This elevation plan maker lets you export your file in multiple formats, like JPEG, PNG, PPTX, PDF, etc. In addition to this, you can easily share the RCP via email or on different social media platforms, like Facebook, Pinterest, Line, and LinkedIn.
Basically, it is simple to create a elevation plan in EdrawMax, just grab a template and keep customizing, drag and drop professinal elevation symbols to make your plan better. If you are still confusing about how to make a elevation design or elevation plan in EdrawMax, just check this elevation plan guide, or check the video below. Or you can find more tutorial videos from our Youtube
12. The Elevation Plan Examples & Templates
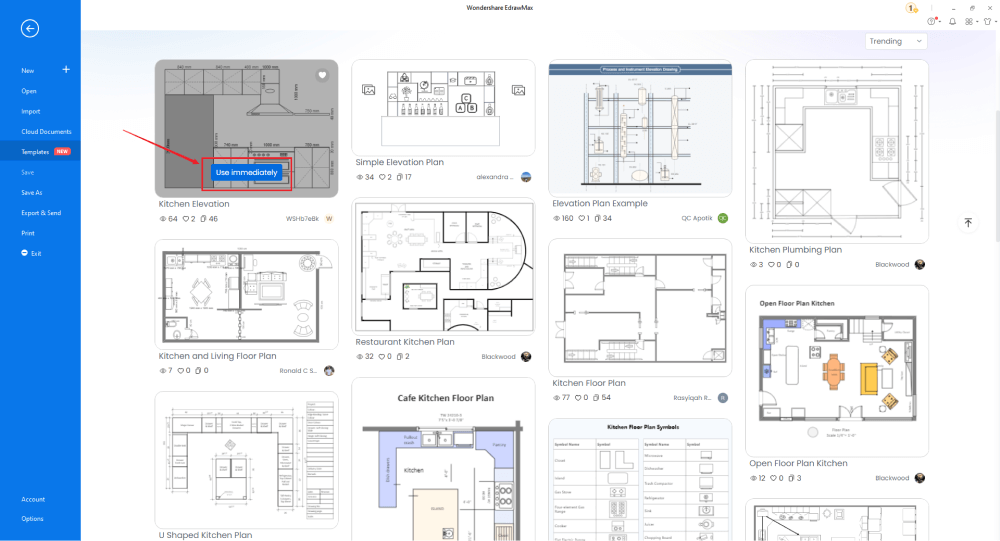
There are 4 examples of elevation plans that you can refer or use immediately. Just click the image to download EdrawMax, and download the templates accordingly. Then double click to open the templates and customize as your prefer. Or open the templates from EdrawMax Online , and duplicate the templates. Click this elevation plan examples to get more inspirations.
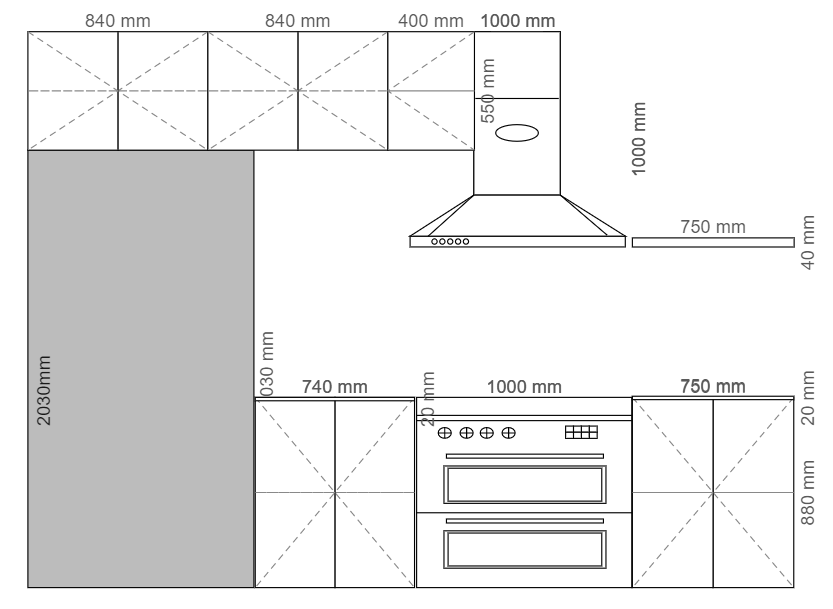
Example 1: Kitchen Elevation
Following is a kitchen elevation plan that shows how a kitchen elevation drawing is an orthographic projection that illustrates only one side of the house. It should be noted here that a kitchen elevation aims to show the finished appearance of a given kitchen side. The simple kitchen elevation plan suggests the most common view used to describe the external appearance. The primary procedure of drawing a kitchen elevation plan is to place the floor plan directly above the space where the Elevation is to be drawn, then create the exterior walls represented by the Elevation. As the following kitchen elevation plan suggests, you should always measure the height and length of the kitchen desks as you go on and create the kitchen elevation plan.
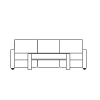
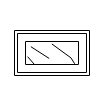
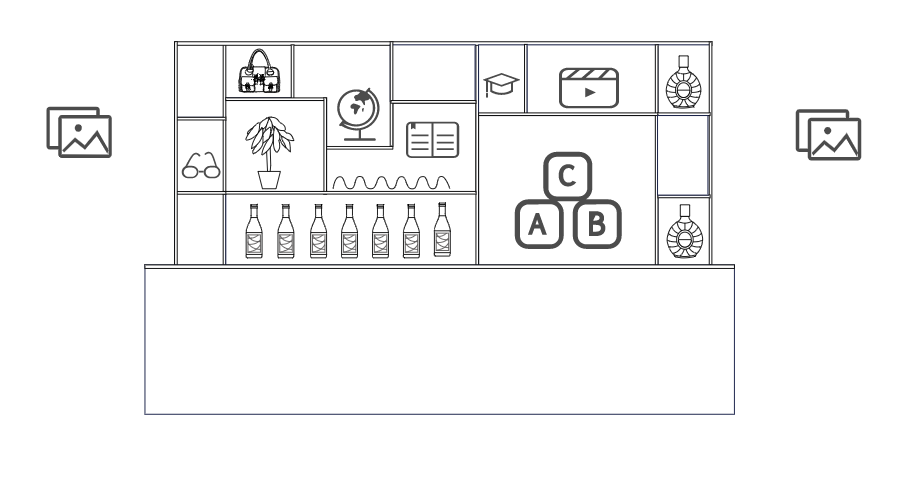
Example 2: Simple Elevation Plan
Following is the simple elevation plan that shows the counter, shelf, and other important items that you can place on the shelf of that particular counter. It should be noted here that a simple elevation drawing aims to show the finished appearance of a given side of the house and furnish vertical height dimensions. An elevation plan is a view of a building seen from one side, a flat representation of one facade. With EdrawMax, you can easily customize such great-looking elevation plans for your usage.
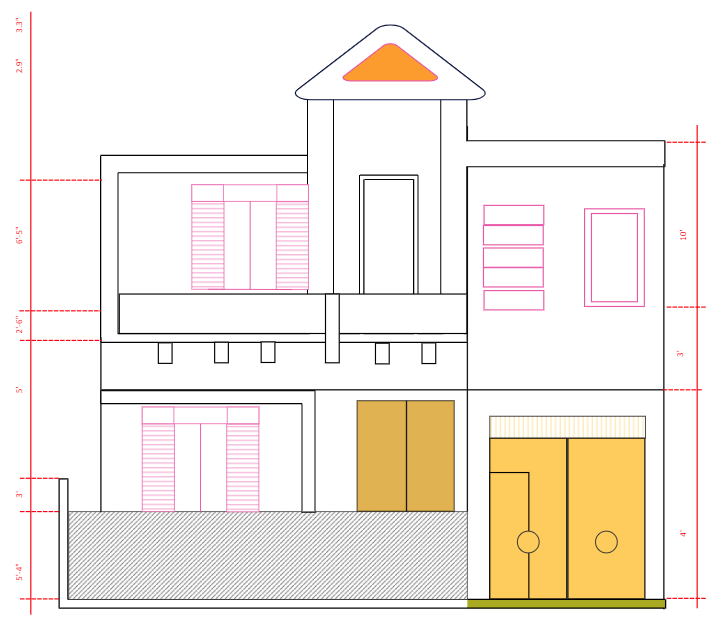
Example 3: Front Elevation Plan
The following is an elevation plan drawing showing the exterior of the building. As you can see from the front Elevation, you should always consider the design as per the floor plan. Exterior elevations are as-built drawings that show the exterior sides of the building, from ground level up to the top of the structure. In addition to this, together with the floor plan and roof plan, the exterior elevations round out the typical set of the design. It should be noted here that four exterior elevations are usually required for a home, like the front, the rear, and sides.
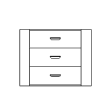
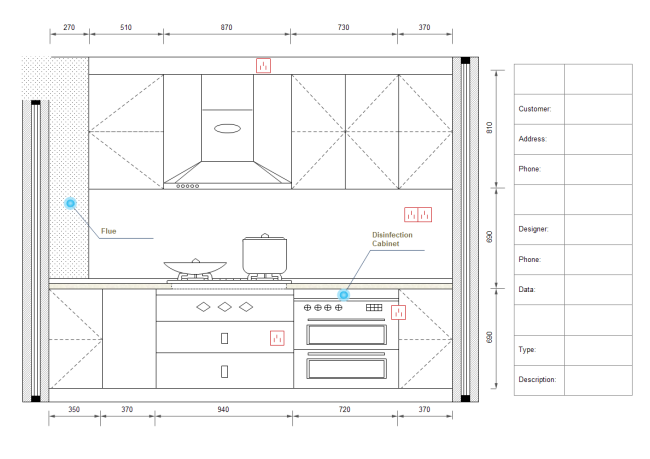
Example 4: Kitchen Elevation Plan
The following is a kitchen elevation drawing showing the important parts of the elevation plan design. As you can see here, we have proper height and width labeled. In addition to this, we also have proper marking for disinfection cabinets and flue. Remember to add the legend table next to your elevation floor plan, as it would be helpful for others to understand it and work around it.
13. Free Elevation Plan Software
Elevation Plans or Elevation Floor Plans may sound like a complex design because of their nature and the complexities it brings when you start working on the building's site plan. However, if you have the right information and the right tool, you can create technically correct elevation plans and share them with your architect to get their feedback.
After reading the simpler steps of creating the Elevation Plans in EdrawMax , we have pointed out some amazing features you will get once you start using it to make the elevation floor plan for your building's current or ongoing requirements.
key Features of EdrawMax:
- EdrawMax has built-in a set of great-looking templates and themes with advanced effects. With the help of easy and intuitive formatting, changing the whole diagram is easy and simpler. In short, you do not have to be a professional to create an elevation plan for your building -- our free templates, symbols, and online resources can help you achieve that with minimalist efforts.
- EdrawMax symbols, icons, and shapes are vector graphic files with high clarity and easy modification. With EdrawMax, you can import the n-number of elevation symbols and resize them to whatever size is required from your side.
- EdrawMax is designed by professionals who know the importance of smart tools. These smart tools are provided in your canvas for automatic formatting. With these smart tools, you can easily arrange, rotate, group, and align many different objects.
- Unlike other tools that lack customization options, EdrawMax is power-packed with several customization options -- from adjusting the line width, line color, line style, font size, font color, text color, adding vector-text, and more, and you can do almost everything related to drawing in this elevation floor plan maker.
- With EdrawMax, you can easily add photos, images and edit text fields.
14. Final Thoughts
As illustrated here in this guide to understand the elevation plan, Elevation drawings are a specific type of drawing architects use to illustrate a building or portion of a building. An Elevation is drawn from a vertical plane looking straight onto a building facade or interior surface. This is as if you were directly in front of a building and looked straight at it. You can easily create your elevation plan without worrying about the dimensions and symbols with the right tool and resources.
The moment you start using EdrawMax , you will realize that the tool comes with several amazing features that ease your efforts in creating the elevation plans and help you share the designs with your architects and builders using the easy sharing option. With EdrawMax, you can export your file into multiple formats, and if you are using the online version of this elevation floor plan maker, you can go ahead and share your 2D elevation drawings on different social media platforms, like Facebook, Twitter, LinkedIn, and Pinterest. All in all, EdrawMax is a wonderful tool that caters to all of your designing and drawing needs.
Floor Plan Complete Guide
Check this complete guide to know everything about floor plan, like floor plan types, floor plan symbols, and how to make a floor plan.
You May Also Like
HVAC Plan Complete Guide
Knowledge
House Plan Complete Guide
Knowledge
Table Plan Complete Guide
Knowledge
Office Layout Complete Guide
Knowledge
Garden Plan Complete Guide
Knowledge
Security Access Plan Complete Guide
Knowledge


