How to Draw an Elevation Plan
Edraw Content Team
Do You Want to Draw Your Elevation Plan?
EdrawMax specializes in diagramming and visualizing. Learn from this article to know everything about how to draw your elevation. Just try it free now!
The term 'elevation' refers to an orthographic representation of the exterior sides of a building, rooms, kitchen, or any side of these architectural aspects in the architecture industry. It should be noted here that the elevation drawing illustrates the structural and architectural detail. In this elaborated guide to understanding the elevation floor plans , we will help you understand why the elevation is drawn from a vertical plane looking straight onto a building facade, what is included in a kitchen drawing, and how easy and efficient it is to create an elevation of buildings using EdrawMax.
Before we guide you in selecting the best kitchen drawing symbols, let us help you understand some of the basic preparations that you have to do while you work on the elevation drawing.
1. What Includes in an Elevation Plan
There are several types of elevation plans that one can create for architectural purposes. The most commonly used elevation views are building elevation, home elevation, kitchen elevation, and bathroom elevation. Depending upon the elevation type, the process of reading an elevation plan will change, and so do the elements included in any elevation plan. That being said, some of the most common elements or features that are included in an elevation plan are:
- The basic outline of the building.
- The outlines for the main door, windows, and garage area (if any).
- The detailed dimension and shape of the required roof area.
- Balcony areas or the exterior walls that are already completed by the builder.
- The dimension of the entire building is noted on the sides.
- The outline of the building;
- the outline of the door, window, garage;
- the dimension and shape of entire building.
2. Preparations for Drawing an Elevation Plan
The core purpose of creating an elevation plan is to illustrate what the exterior and interior of an actual building elevation would look like when seen from the front or a particular angle. Some of the basic preparations that you need to do as you draw an elevation drawing are:
- Understanding the dimensions
- Understand other plans
Discuss with your architect their requirements and then start taking the measurements of the entire layout. The common grounds of the measurement include the height, width, and length of the wall.
It is highly recommended that you consider other plans before working on the elevation drawing. If you have a floor plan, reflected ceiling plan, and such handy with you, it becomes easier for you to create an elevation view of the building.
In addition to the elements mentioned above, the building elevation design also includes the height of the building and doors and windows.
EdrawMax
Free Elevation Plan Software
- Superior file compatibility: Import and export drawings to various file formats, such as Visio
- Cross-platform supported (Windows, Mac, Linux, Web)
3. How to Draw an Elevation Plan in General
In most cases, the elevation plan and floor plan sound almost alike. However, there is a huge difference between the two. You will understand the core difference between the elevation view and floor plan when you start designing the elevation plan.
As you see here, there are primarily two ways of creating an elevation plan -- the first is a traditional approach followed by the engineers from yesteryears, and another way is where you use EdrawMax to create the elevation plan. Let us first see how you can draw elevation plans using general methods.
- Draw main floor wall:
- Determine the wall heights:
- Draw windows & doors:
- Draw the roof:
- Add decks & railings:
- Discuss:
- Finalize the design:
Take a reference to your pre-designed floor plan and measure the horizontal distance of all the halls. Always consider the thickness of any siding material when measuring the horizontal walls.
The wall heights help determine how high the wall would be above its unfinished floor height. Remember to consider that the height of the ceiling of the rooms should always be within this section of the building.
To draw all the windows and doors, measure from the horizontal lines of your floors to position the exterior doors and windows.
To draw the roof for each elevation view, you should first consider whether the roof will overhang and drop below the exterior wall on the elevation plan you are currently drafting.
Decks, porches, railings, and stairways should always be added to the design after you have already drawn the windows and doors and measured the height. Such elements provide a valuable outlook to your evaluation design.
Once you have added the windows and doors and correctly measured the wall heights, you can make it a habit to discuss it with your architect or builder. They will provide you with useful revisions that will improve the elevation design.
After you are done with all the revisions, you can go ahead and finalize the elevation plan design.
- Draw main floor wall;
- Determine the wall heights;
- Draw all the windows and doors;
- Draw the roof for each elevation view;
- Add decks & railings;
- Make it a habit to discuss it with your architect or builder.
4. How to Draw an Elevation Plan in EdrawMax
Now that you are wondering how to draw an elevation plan? Well, there are basically two ways that you can follow. The first method is to draw a wardrobe plan from scratch using EdrawMax, and the other method is when you work smartly and choose templates provided by EdrawMax. Here we will walk you through the basic ways of drawing an elevation.
4.1 Draw an Elevation Plan from Scratch
Step1 Login to EdrawMax
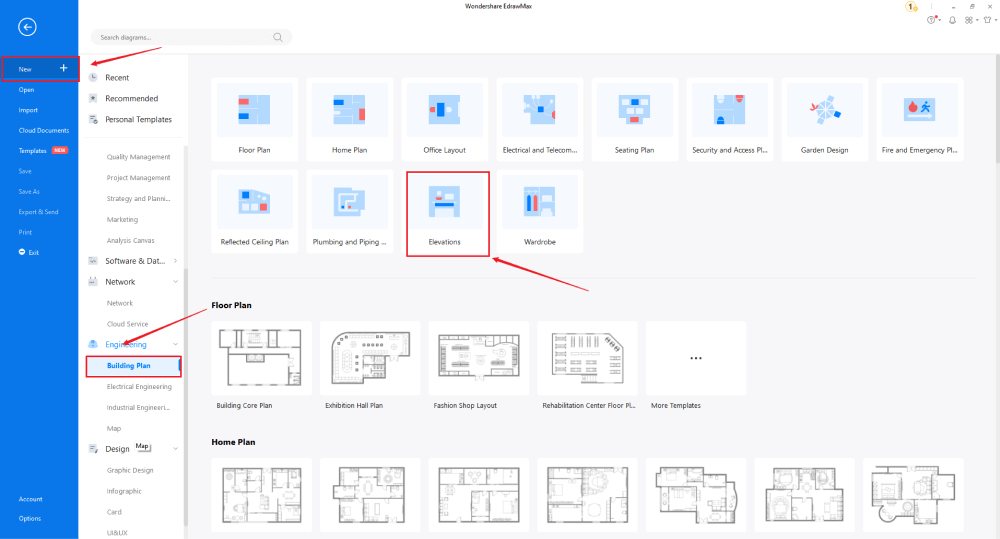
If you are using the offline version of EdrawMax, then open the tool in your system. If you wish to have remote collaboration, head to EdrawMax Download and log in using your registered email address. If this is your first time using the tool, you can register yourself using your personal or professional email address. Go to 'Building Plan' and click on 'Elevations."
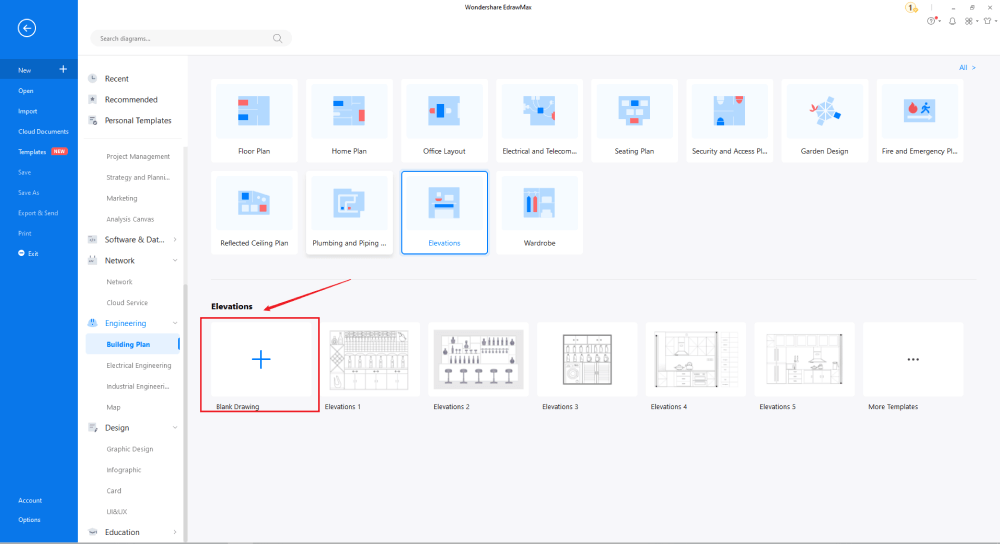
Step2 Open a New Canvas
Since you are creating the elevation plan diagram from scratch, you can click '+.' Simultaneously, click on 'Elevations' to access free templates or sketches provided by EdrawMax. After clicking on '+,' It will open up the user-friendly EdrawMax canvas. Once you have your floor plan ready, take inspiration from it and start working on your elevation plan.
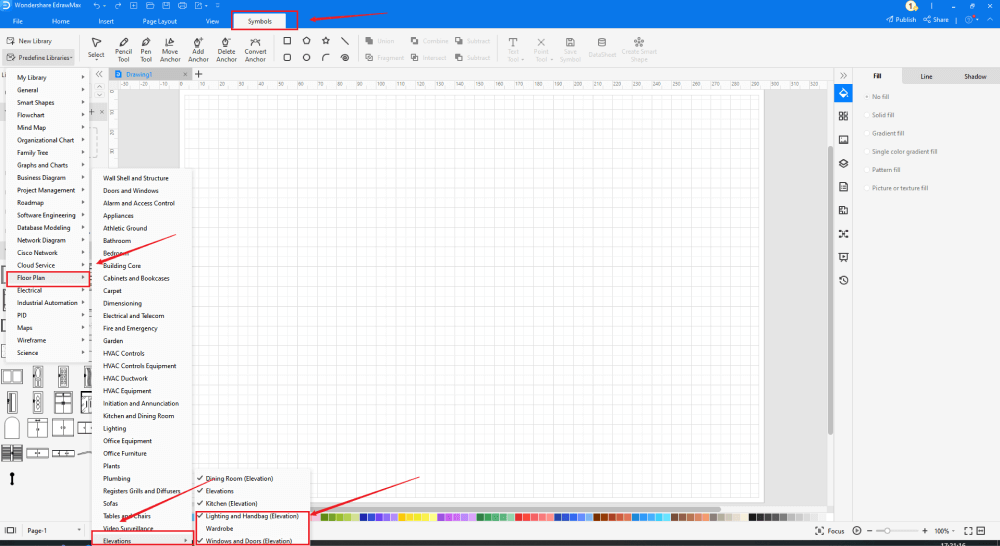
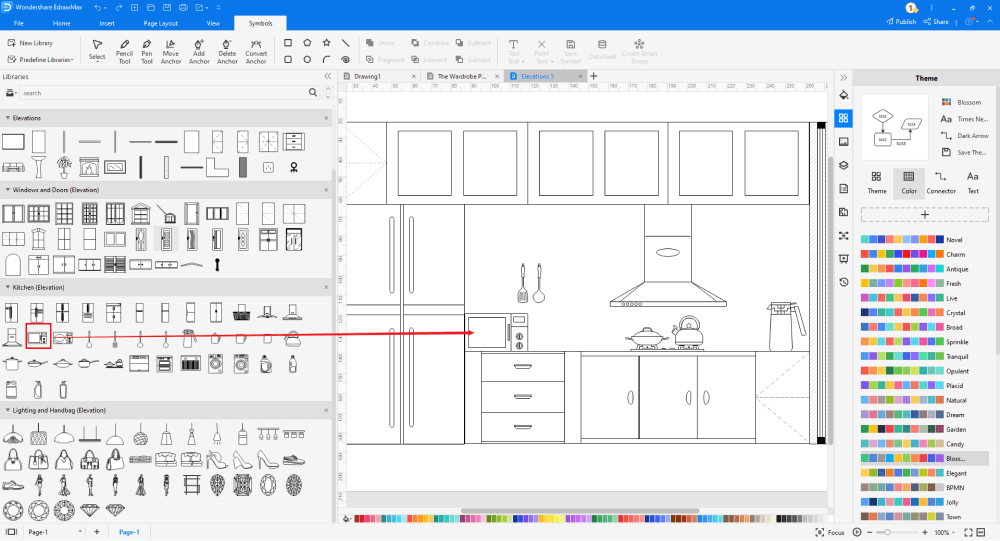
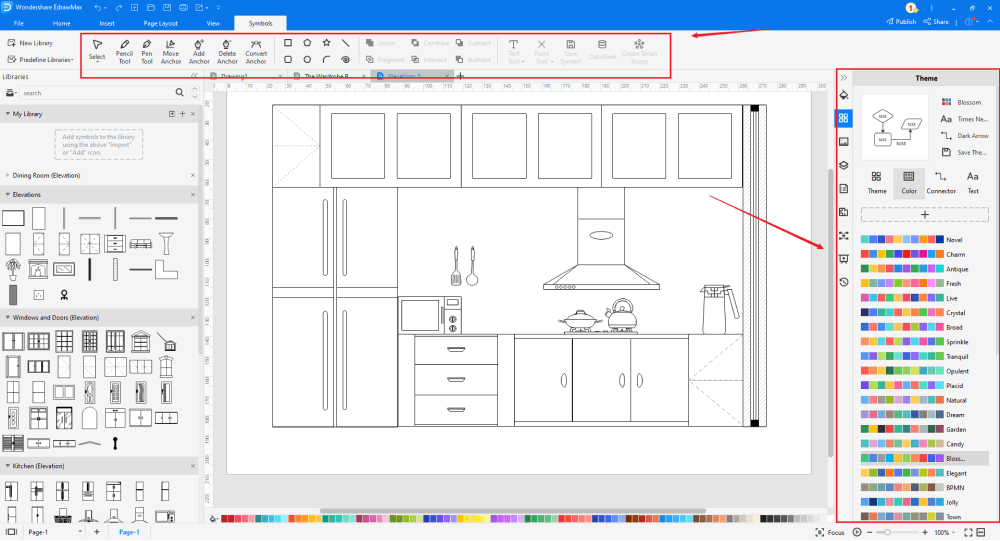
Step3 Find Elevation Symbols
Every elevation plan diagram is incomplete without symbols. You will find different symbols for making the elevation plan on the left panel. Click on 'Elevations,' 'Kitchen (Elevation),' 'Lighting & Handbag (Elevation), and Windows & Doors (Elevation)' to access all the hundreds of free built-in elevation plan symbols. If you cannot find your desired elevation plan symbol, create the shape using the Pen Tool or Pencil Tool, and then click '+' on the My Library section to save your symbol for future usage. Learn more elevation symbols and find symbols you want here.
Step4 Add Elements
Once you have imported all the symbols, you can start placing them in the elevation plan layout that you have created in Step #2. In your elevation design, you can add elements like lighting, clothing, window, door, cabinet, cabinet, bedside cabinet, etc. These symbols are vector-based, so you can recolor, reshape, and resize them without losing their formatting.
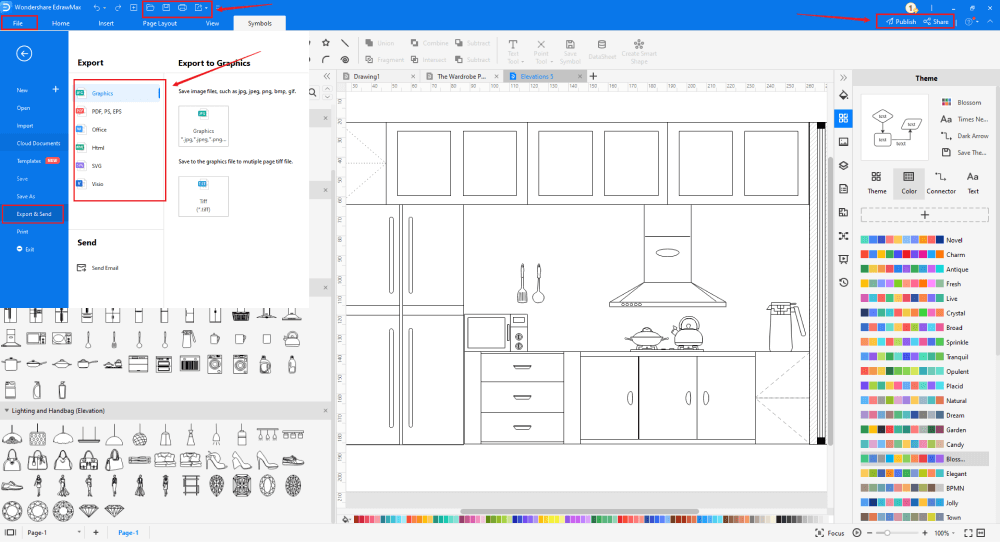
Step5 Save & Export
After designing the elevation plan diagram, you can export it into multiple formats, like JPEG, JPG, PNG, PDF, and other Microsoft formats, like MS Word, MS Excel, PPTX, etc. You can also share the elevation view on different social media platforms, like Facebook, Twitter, LinkedIn, etc. Moreover, you can print your plumbing plan drawing for showing with others.
4.2 Draw an Elevation Plan from Templates
Step1 Login to EdrawMax
If you are using the offline version of EdrawMax, then open the tool in your system. If you wish to have remote collaboration, head to EdrawMax Download and log in using your registered email address. If this is your first time using the tool, you can register yourself using your personal or professional email address. Go to the 'Templates' section on the left and type 'elevation plans.'
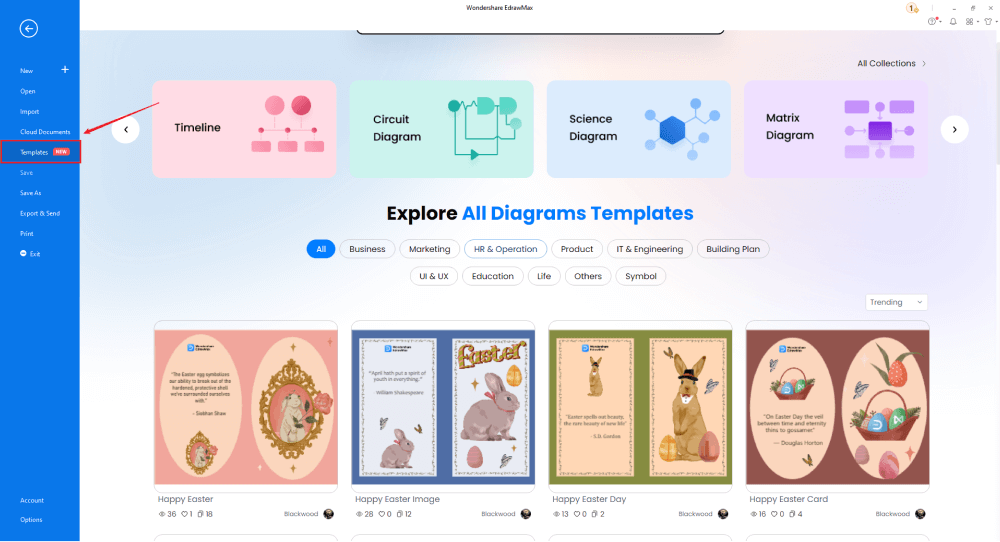
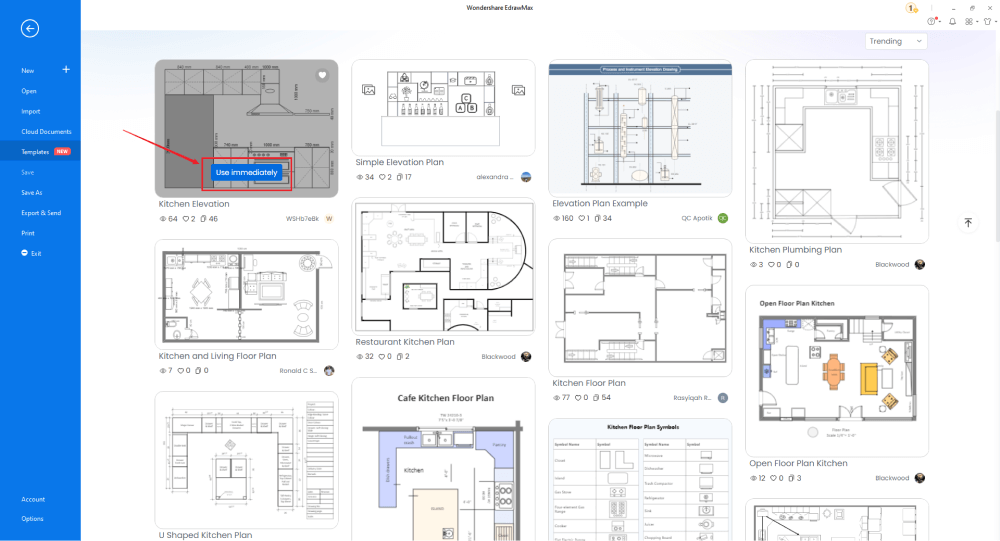
Step2 Choose a Template
In the Template Community, you will find hundreds of built-in templates readily available to use. Choose any templates that closely resemble your ideal elevation plan drawing and duplicate it to 'Use Immediately.'
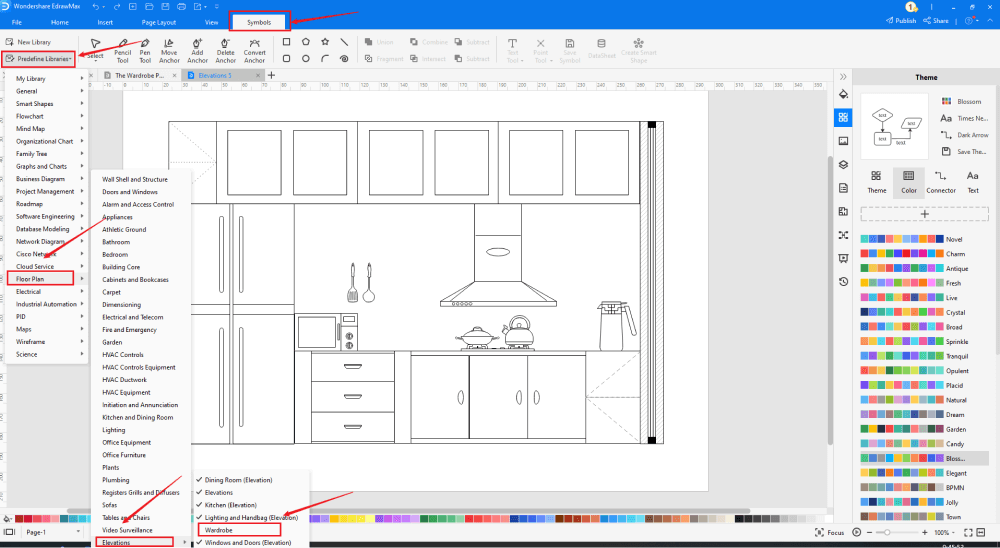
Step3 Add Symbols
Head to the 'Symbols' section and click on the 'Predefined Symbol' section from the top toolbar. Click on 'Elevations' to import them to your library. If you cannot find your desired elevation plan symbol, create the shape using the Pen Tool or Pencil Tool, and then click '+' on the My Library section to use the symbol for future usage.
Step4 Change Details
Once you have imported the free built-in template to the EdrawMax canvas, you can change basic details. You can add or modify the basic elevation plan details that you deem fit necessary for the current requirement from the imported symbols. You can even import your company's logo, change the background color, resize the entire design, color the walls, change the scale ratio, etc. Just choose the toolbars on the top or right side of canvas, and find the functions you want.
Step5 Export or Publish
Once your elevation view is ready, you can export it to multiple formats or publish it to the template community for the other 25 million registered users to see and get inspired by your design. Click the "Publish" button on the top right area of the canvas, and fill in your template details, like template title, description, and tag to share your drawing with others.

Basically, it is simple to draw an elevation plan in EdrawMax, just grab a template and keep customizing, drag and drop professinal elevation symbols to make your plan better. If you are still confusing about how to draw an elevation plan in EdrawMax, just check the video below, or learn more from our Youtube channel.
5. Tips & Consideration
The most important part that you need to understand here is:
- What is your current technical expertise?
- What sort of elevation plan do you currently need?
If you are a novice or just a beginner, you can go with the free templates provided by EdrawMax. As you saw here, your elevation view that you have created using free templates will be ready to be added to your blueprint in just a couple of minutes. If you have previously worked on multiple elevation plan designs and know your way around the designing tool, then you can create the elevation plan from scratch using the design features provided by EdrawMax.
Lastly, if you need a professional-looking elevation design that you can share with your friends or carpenters, it is highly recommended to go with EdrawMax. As you saw here, if you create the elevation plan using the traditional methods, it would be way too problematic to share the design every time you make any changes.
5.1 Comparison between EdrawMax Methods
The core difference between both the EdrawMax methods are:
Create Elevation Plan from Scratch:
-
Expertise: Creating the elevation plan from scratch requires technical expertise
-
Easy: Creating the elevation from scratch would be a little clumsy if you have not created such elevation views in the past.
Create Elevation Plan using Templates:
-
Expertise: Creating the elevation plan using free templates does not require too much technical knowledge.
-
Easy: Creating the elevation plan using free templates is easy. Just click on the template and duplicate it -- your elevation plan design is ready to use.
5.2 Comparison between General and EdrawMax Methods
The core difference between creating the elevation plan using the general method and EdrawMax methods are:
General Method:
-
Easy: Creating the elevation plan on paper requires much technical expertise and hence is not that easy.
-
Share: You cannot easily share the elevation view with your architect.
-
Advance Feature: Since you are creating everything on paper from your hand, your elevation design will lack technical symbols, measurement details, and dimensions.
EdrawMax Methods:
-
Easy: Creating the elevation plan using free templates does not require too much technical knowledge. Just click on the template and duplicate it -- your elevation plan design is ready to use.
-
Share: EdrawMax comes with multiple sharing options.
-
Advance Feature: EdrawMax is equipped with the architect's scale and has a collection of over 50,000 vector-enabled symbols.
5.3 Symbol Libraries
EdrawMax is equipped with over 50,000 symbols that help you create over 280 types of different diagrams. Some of the most basic elevation symbols that are readily available at EdrawMax are:
- Frame: It is a rigid structure surrounding any door or a windowpane.
- Divider: It divides a whole into more than two parts.
- Drawer: It is a box-like storage compartment that comes without a lid.
- Drainage Pipe: It visualizes a pipe that removes water from the kitchen's basin.
- Gas Cooker: It is a symbol for useful kitchen equipment used to steam rice or lentils.
Template Community
If you are a beginner, just starting with elevation plan drawings or any other building plans, you must be wondering about the easiest ways to create the diagram. Often we see that there are tools available in the market which lack this important feature. When the professionals created EdrawMax, we heard what the beginners wanted -- a collection of fully customizable templates.
EdrawMax has over 10,000 templates that let you create over 280 types of different diagrams. Just head to the Template Community section in the dashboard and type 'Elevation Plan,' You will find multiple free elevation drawings ready to be duplicated by you. Click on 'duplicate,' and that entire template will be imported on your dashboard to customize as per your requirements.
6. Free Elevation Drawing Software
Elevation drawings look a little complicated, but with EdrawMax, you can easily create the elevation view with just a couple of clicks. This free elevation drawings software comes with elevation plan examples & templates, which lets you create an elevation of buildings in just a couple of clicks. There are several other important features of this elevation plan maker, like:
- EdrawMax symbols, icons, and shapes are vector graphic files with high clarity and easy modification. With Pen and Pencil features that you can find in the toolbar, you can easily hand draw any symbol that you want to add to your elevation view.
- With EdrawMax, you do not have to be a professional to create an elevation plan for your building. The user-friendly dashboard of this free elevation drawing software offers several customization options that ease your efforts in creating elevation of buildings.
- EdrawMax is designed by professionals who know the importance of smart tools. So, you do not have to worry about the dimension or scaling. Whatever size you use to create the elevation view would be transformed in all the technical designs.
- This free elevation drawing software lets you import images, icons, photos, etc. It also allows you to share your file on the cloud for better access.
- This free elevation drawing software is completely free! Yes, you do not have to pay any hefty amount to use the amazing elevation plan feature this tool has to offer.
7. Final Thoughts
Elevation drawings are a specific type of drawing architects use to illustrate a building or portion of a building. If you go ahead with traditional ways of creating the elevation diagram, then your design will feel unprofessional and lack the addition of several important elevation design elements. That is why it is always recommended to use EdrawMax for creating all types of building plan designs.
The moment you start using EdrawMax, you will realize that this free elevation drawing software comes with several amazing features that ease your efforts in creating the elevation plans. If you are using the online version of this elevation floor plan maker, you can share your 2D elevation drawings on different social media platforms. Not only this, but with this user-friendly tool, you can download the elevation drawing and attach it to your building's blueprint.

Elevation Plan Complete Guide
Check this complete guide to know everything about elevation plan, like elevation plan types, elevation plan symbols, and how to make an elevation plan.
You May Also Like
How to Draw a Plumbing Plan
How-Tos
How to Draw a Wardrobe Plan
How-Tos
How to Draw a House Plan
How-Tos
How to Draw a Kitchen Elevation
How-Tos
How to Draw an Evacuation Plan
How-Tos
How to Make a Seating Chart
How-Tos

