Embed Excel in VB 6 and Automating Excel
With Edraw office viewer component, it's easy for the vb developers to embed an existing Excel spreadsheet in a form then do the automating.
At form load event the developers can use the Open method to load the *.xls, *.xlsx, *.xslm or *.cvs files from the hard drive or server and open in an area on the form. The Excel file can be read-only, full edited, or prohibited to save by different requirements. The developers can also do the excel automating easily with the excel component.
Click Here to Download Office Viewer Component - Support vb6, vb.net project for Word, Excel, PowerPoint, Visio and Project
![]() 5 MB
5 MB
Embed Excel Component in VB 6 Form
The following article will demo how to Embed the Excel Window in a VB form step by step.
If you haven't the officeviewer.ocx file, you need to install the package firstly.
Start Visual Basic and create a new standard project. Form1 is created by default.
In the Toolbox panel, right click the blank region. Then click the Component...
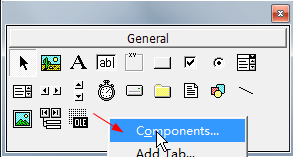
In the pop up dialog, check the Edraw Office Viewer Component.
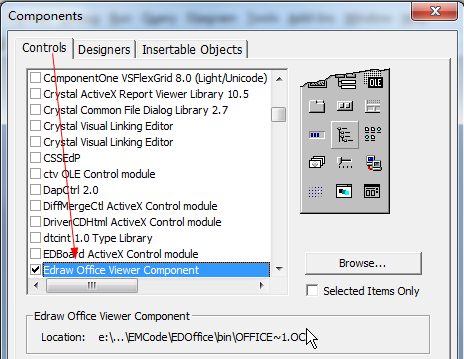
Click the Ok button.
The Office Viewer Component was added in the Toolbar window.

Switch to a VB 6 form, then add the component in it.
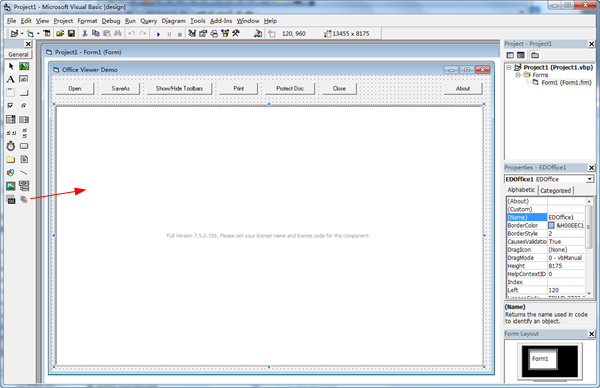
The component includes lots of methods, events and properties to customize the Excel Window.
The developer can use the following code to open an excel file in the Form_Load Event.
Private Sub Form_Load()
EDOffice1.OpenFileDialog
'EDOffice1.OpenWord "d:\test.xlsx"
'EDOffice1.Open "d:\test.xls", "Excel.Application"
End Sub
To protect the Excel worksheet from modification by the end user, the developer needs to add the following code in the DocumentOpened event.
Private Sub EDOffice_DocumentOpened()
EDOffice1.ProtectDoc 1 ' XlProtectTypeNormal
End Sub
There are some wrapped excel automation methods available to create or modify Excel data.
bool ExcelAddWorkSheet(long Index);
bool ExcelDeleteWorkSheet(long Index);
bool ExcelActivateWorkSheet(long Index);
long ExcelGetWorkSheetCount();
bool ExcelSetCellValue(long Column, long Row, BSTR Value);
BSTR ExcelGetCellValue(long Column, long Row);
bool ExcelSetRowHeight(long Row, double Height);
bool ExcelSetColumnWidth(long Column, double Width);
afx_msg bool ExcelDeleteRow(long Row);
bool ExcelDeleteColumn(long Column);
bool ExcelInsertRow(long Row);
bool ExcelInsertColumn(long Column);
bool ExcelInsertPageBreakInRow(long Row);
bool ExcelInsertPageBreakInColumn(long Column);
bool ExcelCopyToClipboard();
bool ExcelPasteStringToWorksheet(BSTR bstText);
Manipulate Excel by using Automation from Visual Basic
Click Project and then click References. The References dialog box appears. Scroll down the list until you find Microsoft Excel object library (Microsoft Excel xx.x Object Library), and then select the item to add a reference to Excel. If the correct object library for your version of Excel does not appear in the list, make sure that you have your version of Excel properly installed.
Click OK to close the References dialog box.
Add a CommandButton to Form1.
In the code window for Form1, insert the following code:
Private Sub Command1_Click()
Dim oXL As Excel.Application
Set oXL = EDOffice1.GetApplication()
Dim oWB As Excel.Workbook
Set oWB = EDOffice1.ActiveDocument()
Dim oSheet As Excel.Worksheet
Dim oRng As Excel.Range
Set oSheet = oWB.ActiveSheet
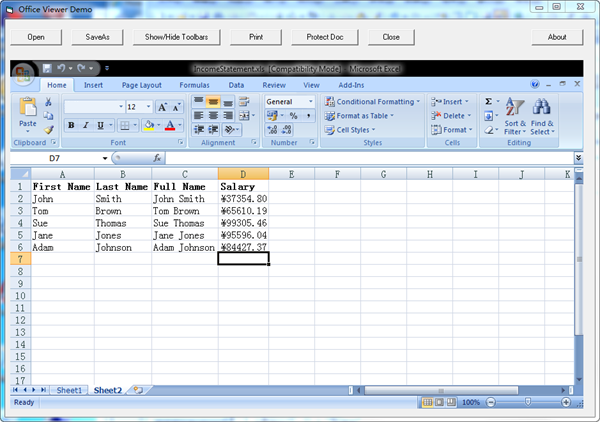
oSheet.Cells(1, 1).Value = "First Name"
oSheet.Cells(1, 2).Value = "Last Name"
oSheet.Cells(1, 3).Value = "Full Name"
oSheet.Cells(1, 4).Value = "Salary"
' Format A1:D1 as bold, vertical alignment = center.
With oSheet.Range("A1", "D1")
.Font.Bold = True
.VerticalAlignment = xlVAlignCenter
End With
' Create an array to set multiple values at once.
Dim saNames(5, 2) As String
saNames(0, 0) = "John"
saNames(0, 1) = "Smith"
saNames(1, 0) = "Tom"
saNames(1, 1) = "Brown"
saNames(2, 0) = "Sue"
saNames(2, 1) = "Thomas"
saNames(3, 0) = "Jane"
saNames(3, 1) = "Jones"
saNames(4, 0) = "Adam"
saNames(4, 1) = "Johnson"
' Fill A2:B6 with an array of values (First and Last Names).
oSheet.Range("A2", "B6").Value = saNames
' Fill C2:C6 with a relative formula (=A2 & " " & B2).
Set oRng = oSheet.Range("C2", "C6")
oRng.Formula = "=A2 & "" "" & B2"
' Fill D2:D6 with a formula(=RAND()*100000) and apply format.
Set oRng = oSheet.Range("D2", "D6")
oRng.Formula = "=RAND()*100000"
oRng.NumberFormat = "$0.00"
' AutoFit columns A:D.
Set oRng = oSheet.Range("A1", "D1")
oRng.EntireColumn.AutoFit
oXL.UserControl = True
End Sub
Press F5 to run the project. The Excel automation will fill in the excel cells.
One thing to keep in mind when automating Excel is the Excel Macro Recorder. It is still there in Word 2007 but hidden away in the Developer Ribbon bar. Kind of strange as the macro recorder was always the simplest way of automating Excel for the average user and they typically don't have the developer ribbon visible.
Embedding MS Word in VB 6 and Do Word Automation
Using Windows API To The Worksheet in VBA
Embedding MS Office in ASP.NET Program
An Easy Way to Embed Excel in a Web Page


