Make Process Steps Diagram with Smart Maker

> Edraw How-To > Make Process Steps Diagram with Smart Maker
author
Posted by James Freeman |
Learn how to make process steps diagrams with smart maker - Edraw. A detailed guide with pictures is illustrated here.

You don't need to be an expert to make professional process steps diagram. You just need a smart maker, with automatic functionality. Edraw is exactly such a maker. Try it and you will adore it.

Process Steps Example Icons

Get a Jump Start with Predefined Shapes

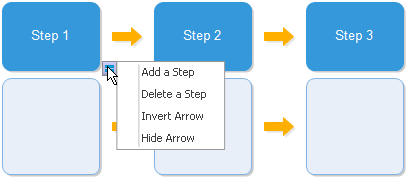
Edraw offers many predefined process steps shapes to save users time and energy. These shapes are all attached with floating action buttons, reducing the hassles of hand drawing. Get a jump start right now.

  • Start Edraw.
  • Choose Business Diagram in the Available Templates list.
  • Double click the Process Steps icon.
  • The corresponding stencil opens on the left along with a blank drawing page on the right.
  • Drag a suitable shape to the drawing page.

  • Process Steps

    Fill in Contents

  • Position the pointer over the shape, then a floating action button appears.
  • Use the floating buttons to add/delete steps or invert arrow direction.
  • Floating Menu of Process Steps

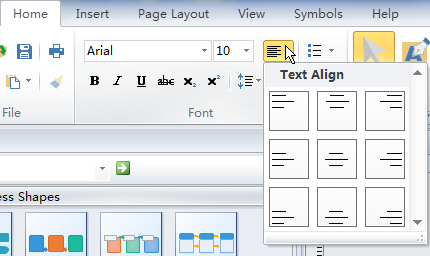
    The following operations can be carried out on Home Menu.

  • Double click the sub shapes to replace text.
  • Align text; adjust font and font size in the Font group.
  • Use Text Tool under Text function to add text box.
  • To move, resize or rotate text box, activate Text Block Tool under Text function.
  • Adjust Text

    Change Process Steps Diagram's Appearance

  • Click on the shape to select the whole shape.
  • Drag the green selection handle to change the overall size.
  • Click twice (time interval is longer than double click) on a certain area to select a sub shape.
  • Drag the blue selection handles to change that subshape's size.
  • ChangeSubshape
  • Applyanewthemetochangethewholeshape's style at one click (on Page Layout menu).
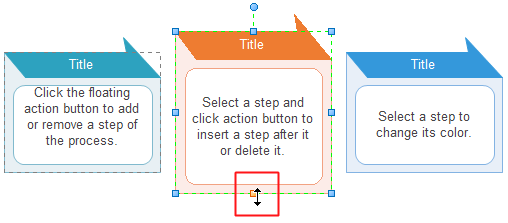
  • For more operations about style modification, see the below section.

    Detailed Introduction of Process Shapes

    There are 21 process shapes in total, each has different style and functions. Most of them have the functions of adding/deleting a step and inverting arrows. To see what you can do to a shape, drag it onto the drawing page, rest the cursor over it to show the floating menu.

    The first shape is Multi-style Process shape. It can be turned into 3 styles as show by the picture below.

    Multi-style Shapes

    As for the seventh shape, you can change the arrow position using the function of Change Arrow Position.

    Change Arrow osition

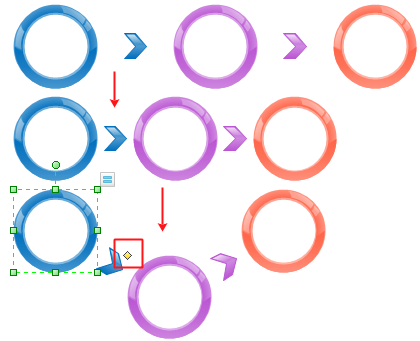
    The 17th shape is made up of circular subshapes. After the shape is selected, a yellow control handle shows along with the selection handles. Drag and move it horizontally to change the interval of subshapes. Drag and move it vertically to turn the shape into arc shape. It is the opposite for the 18th shape.

    CircularProcessShape

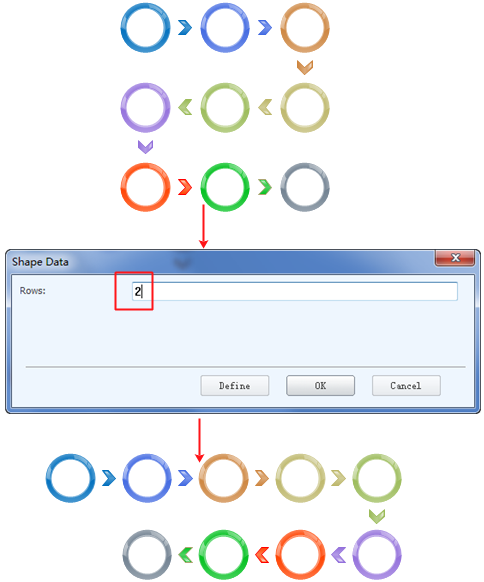
    Someshapes' row number can be adjusted. Take the last shape as an example, you can turn it into 2 rows by using the Set Rows command.

    Set Arrows

    As you can see from the above introduction and illustrations, Edraw is extremely versatile and flexible. Why still hesitate to own it? You can download a trial version firstly.

    download EdrawMind
    main page

    Get Started! You Will Love This Easy-To-Use Diagram Software

    EdrawMax is an advanced all-in-one diagramming tool for creating professional flowcharts, org charts, mind maps, network diagrams, UML diagrams, floor plans, electrical diagrams, science illustrations, and more. Just try it, you will love it!